How to text input

Seeing that there is some confusion with UI elements, and how to communicate with your composition in realtime, here is a short primer on how to use a keyboard for text input in Vuo. Note that this relies on my ListTools found here for the ability to erase text easily.

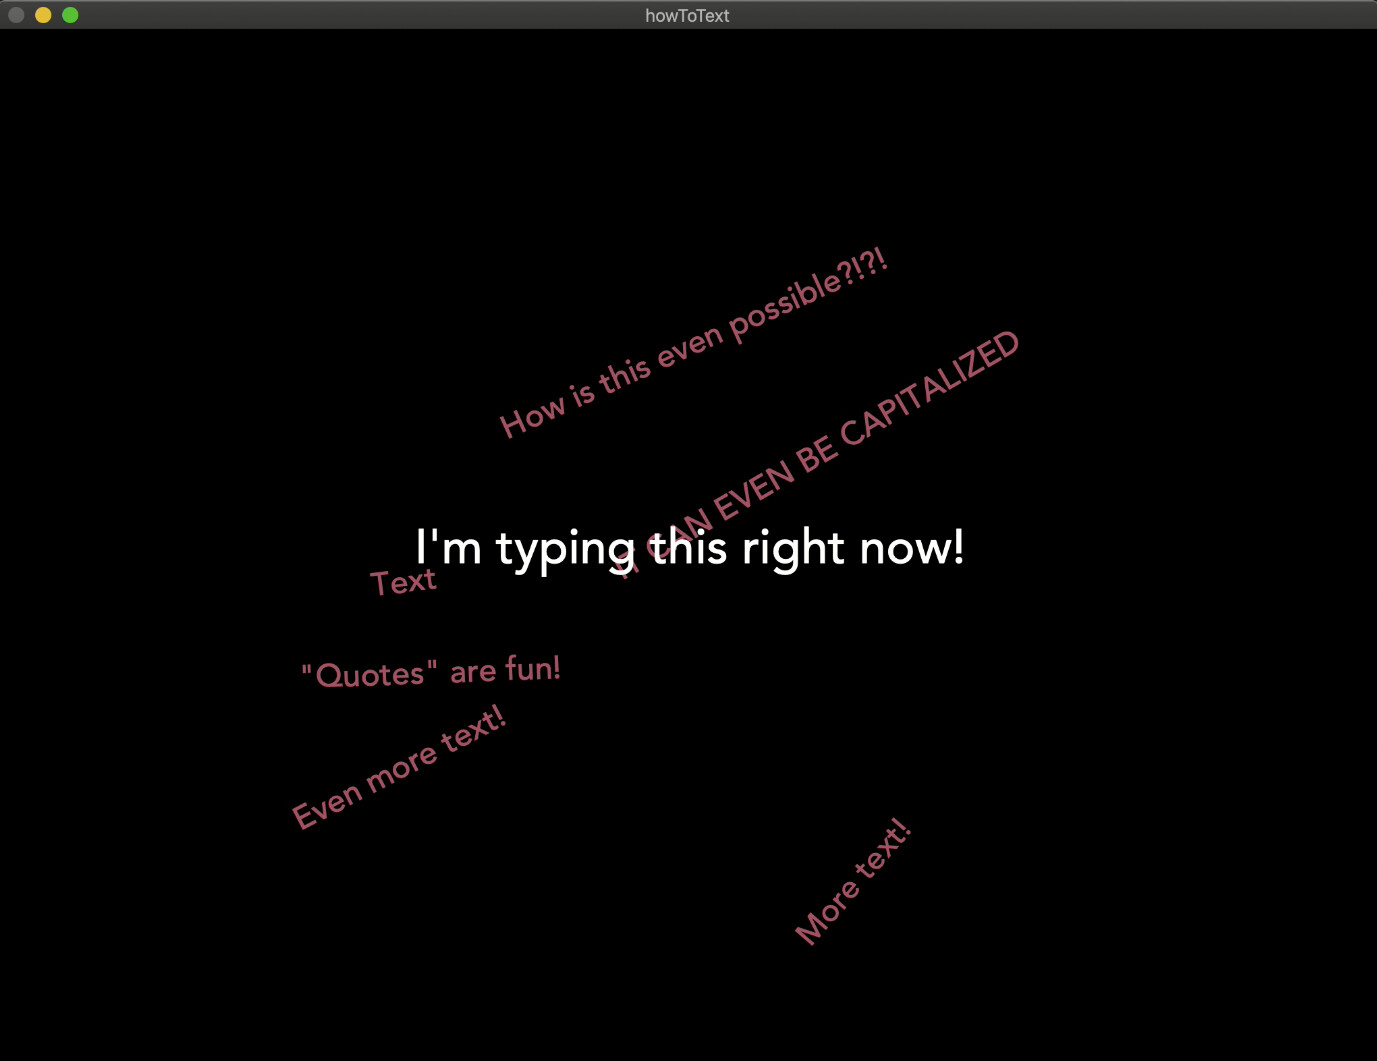
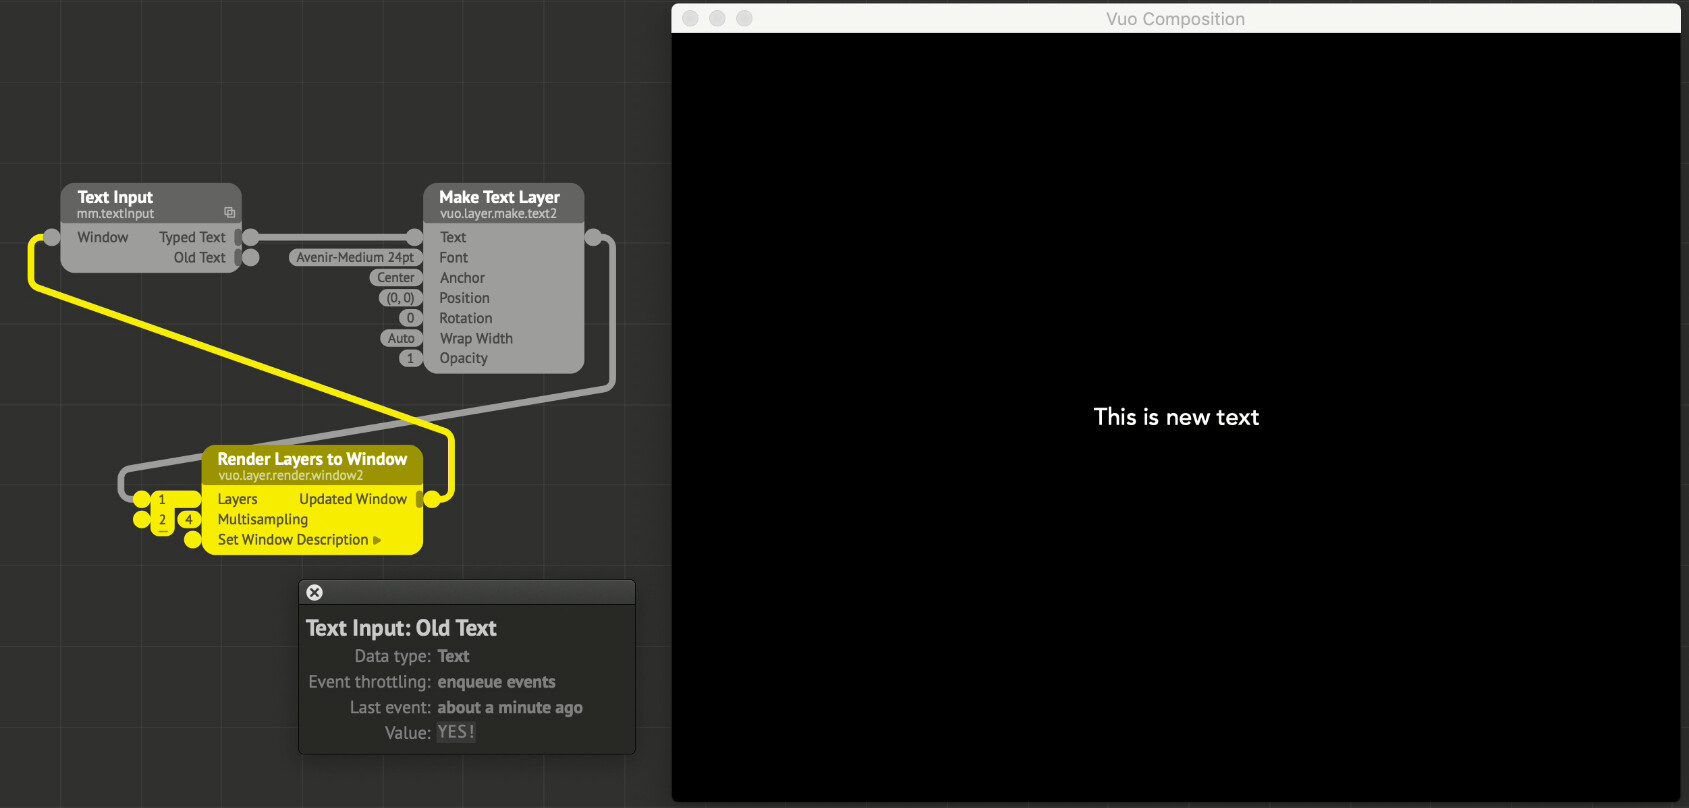
With a mission statement of wanting to type to a composition in realtime, see what you are typing, and doing something with each typed element, we can end up with something like this:

result.jpg

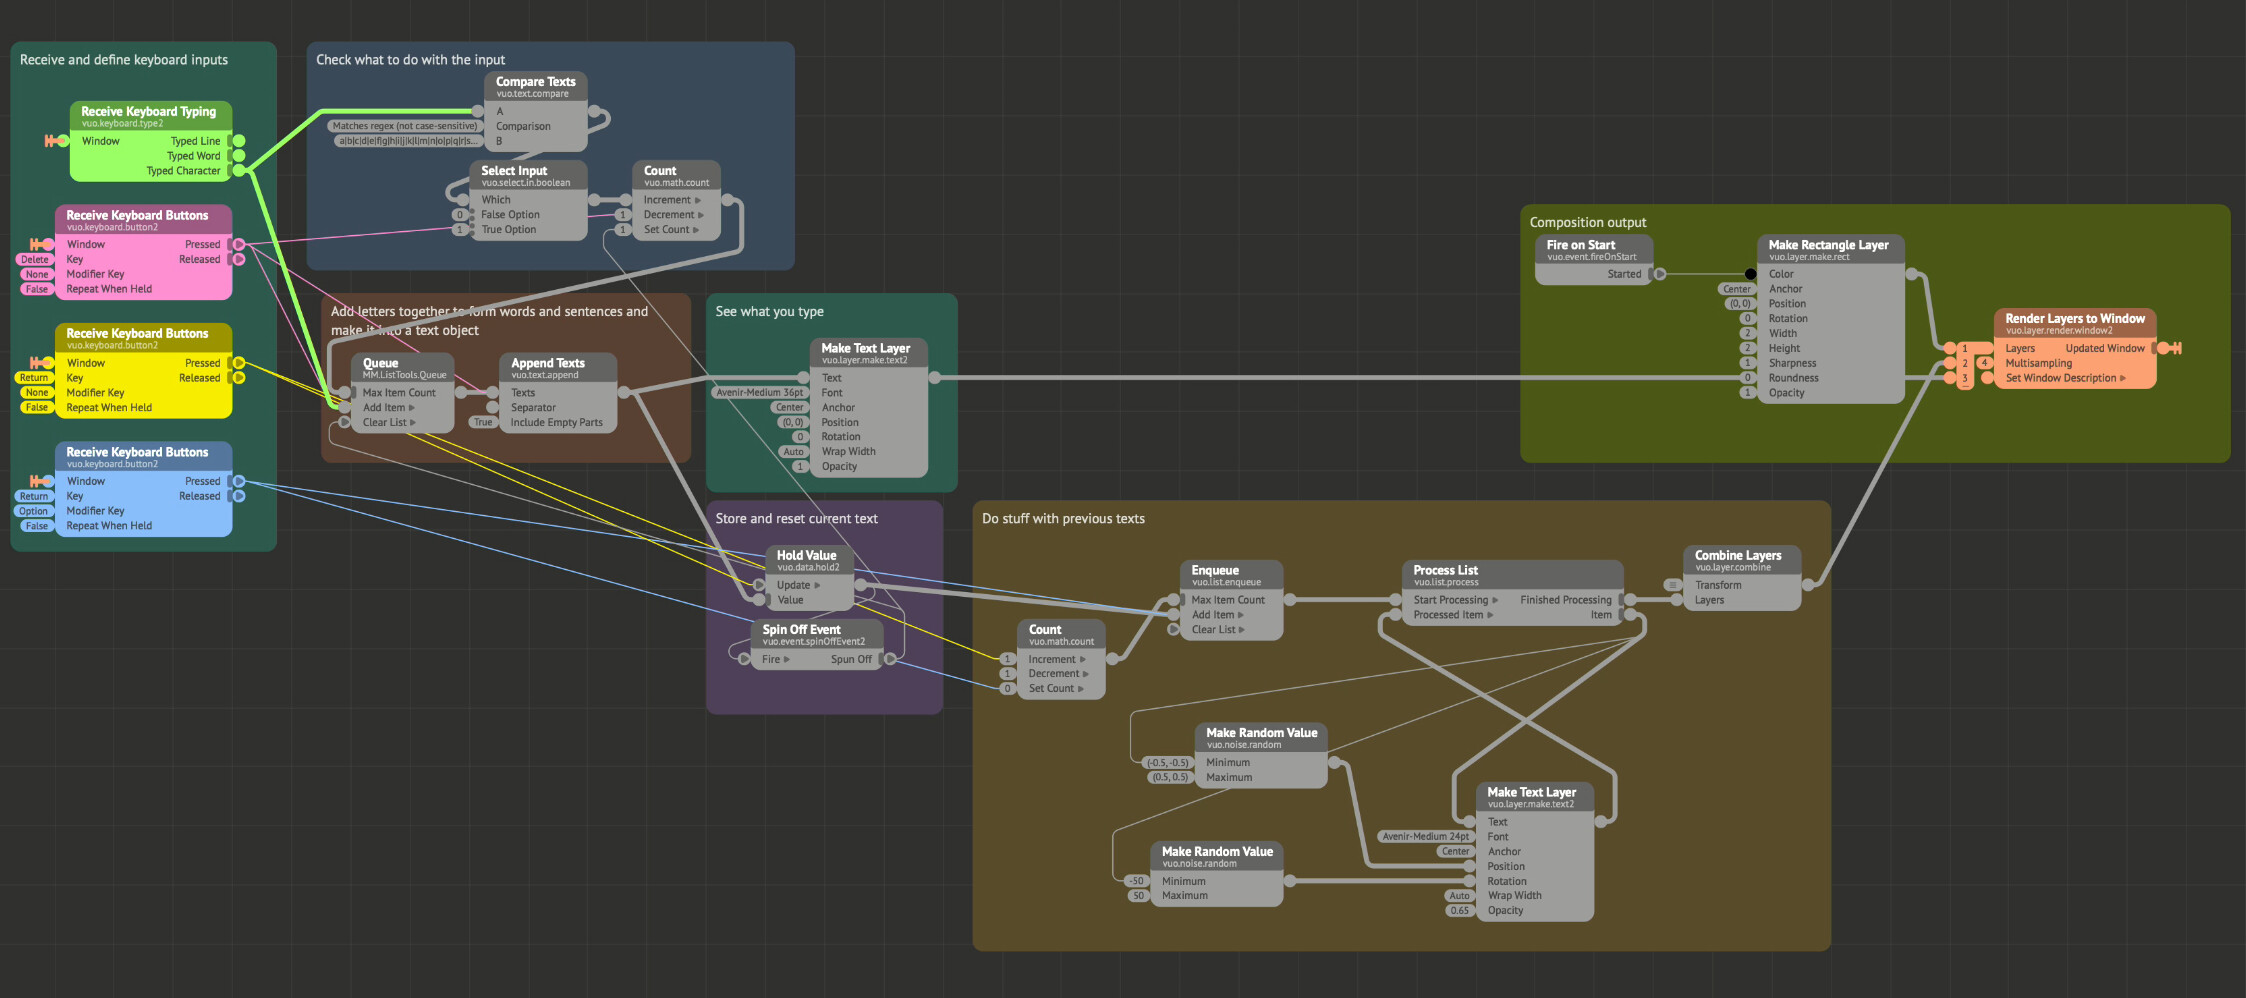
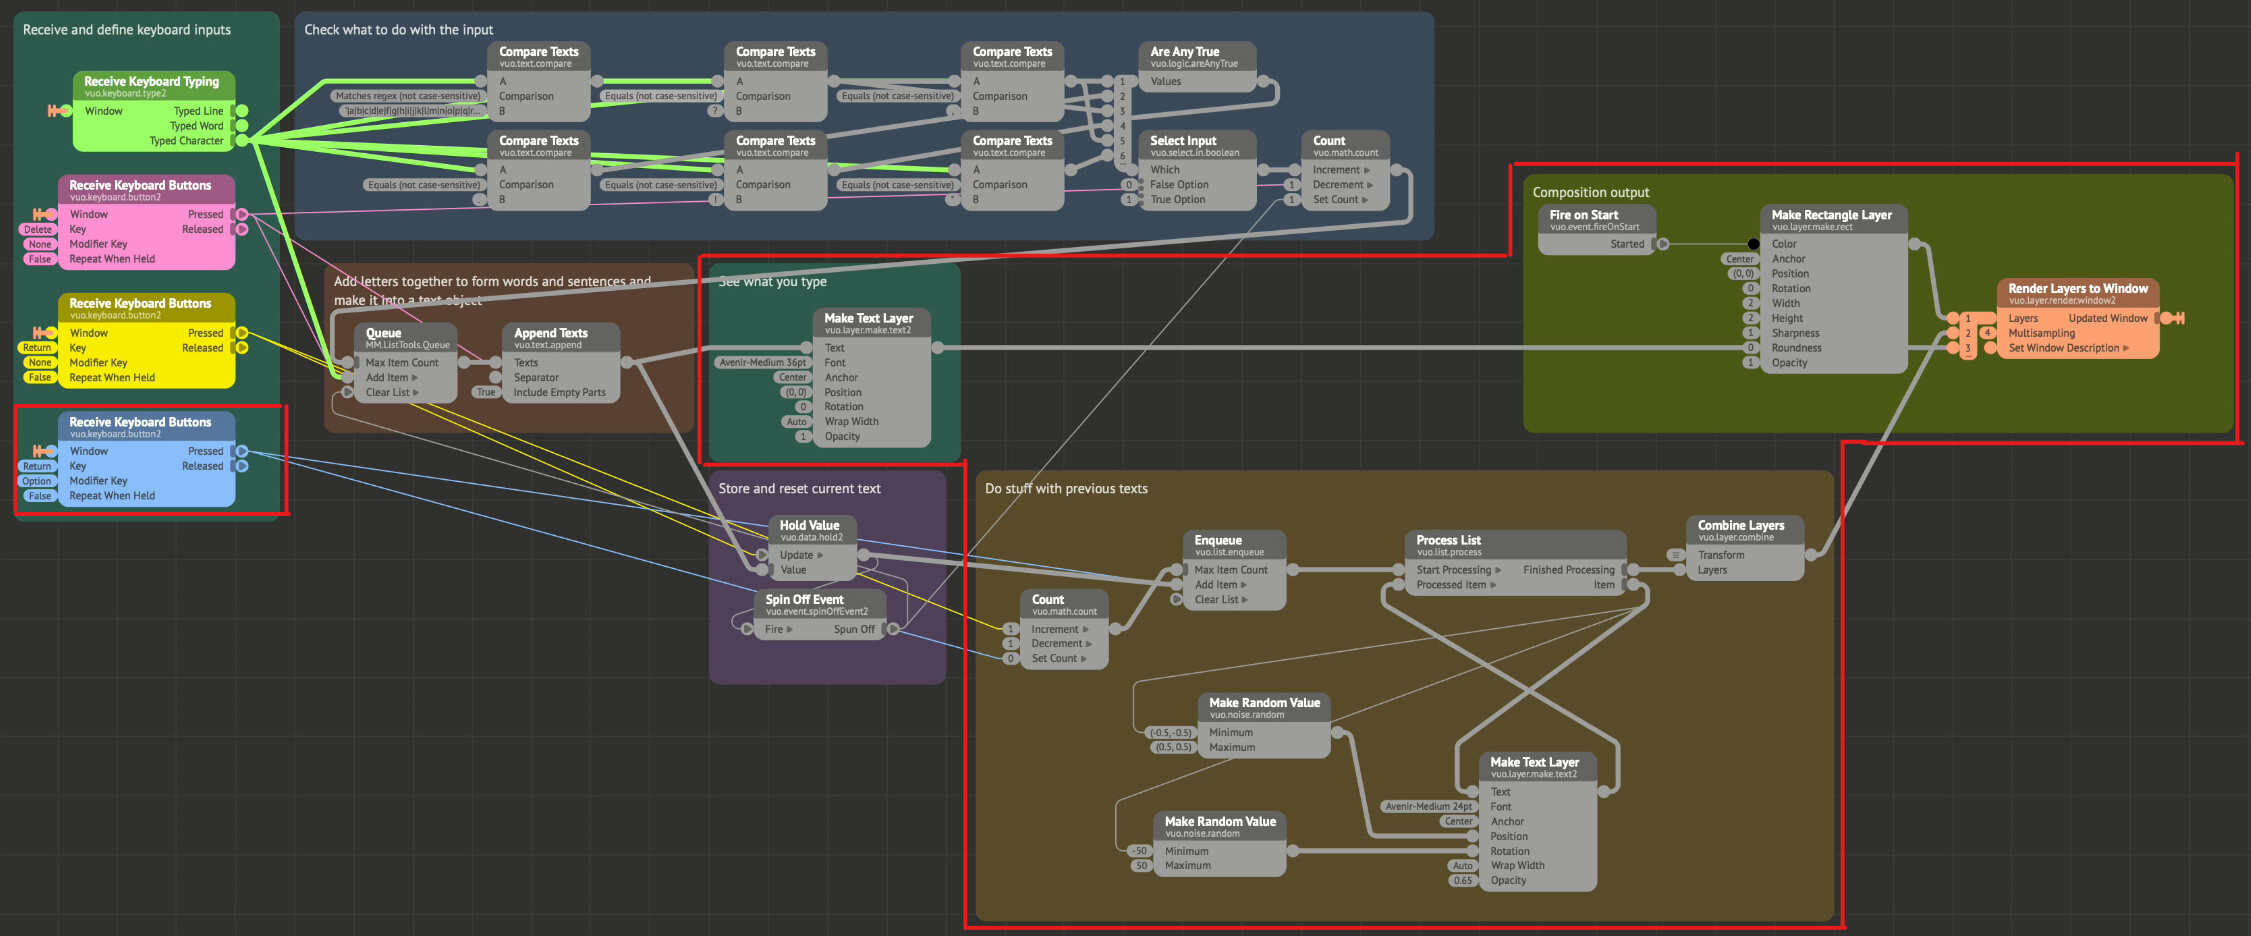
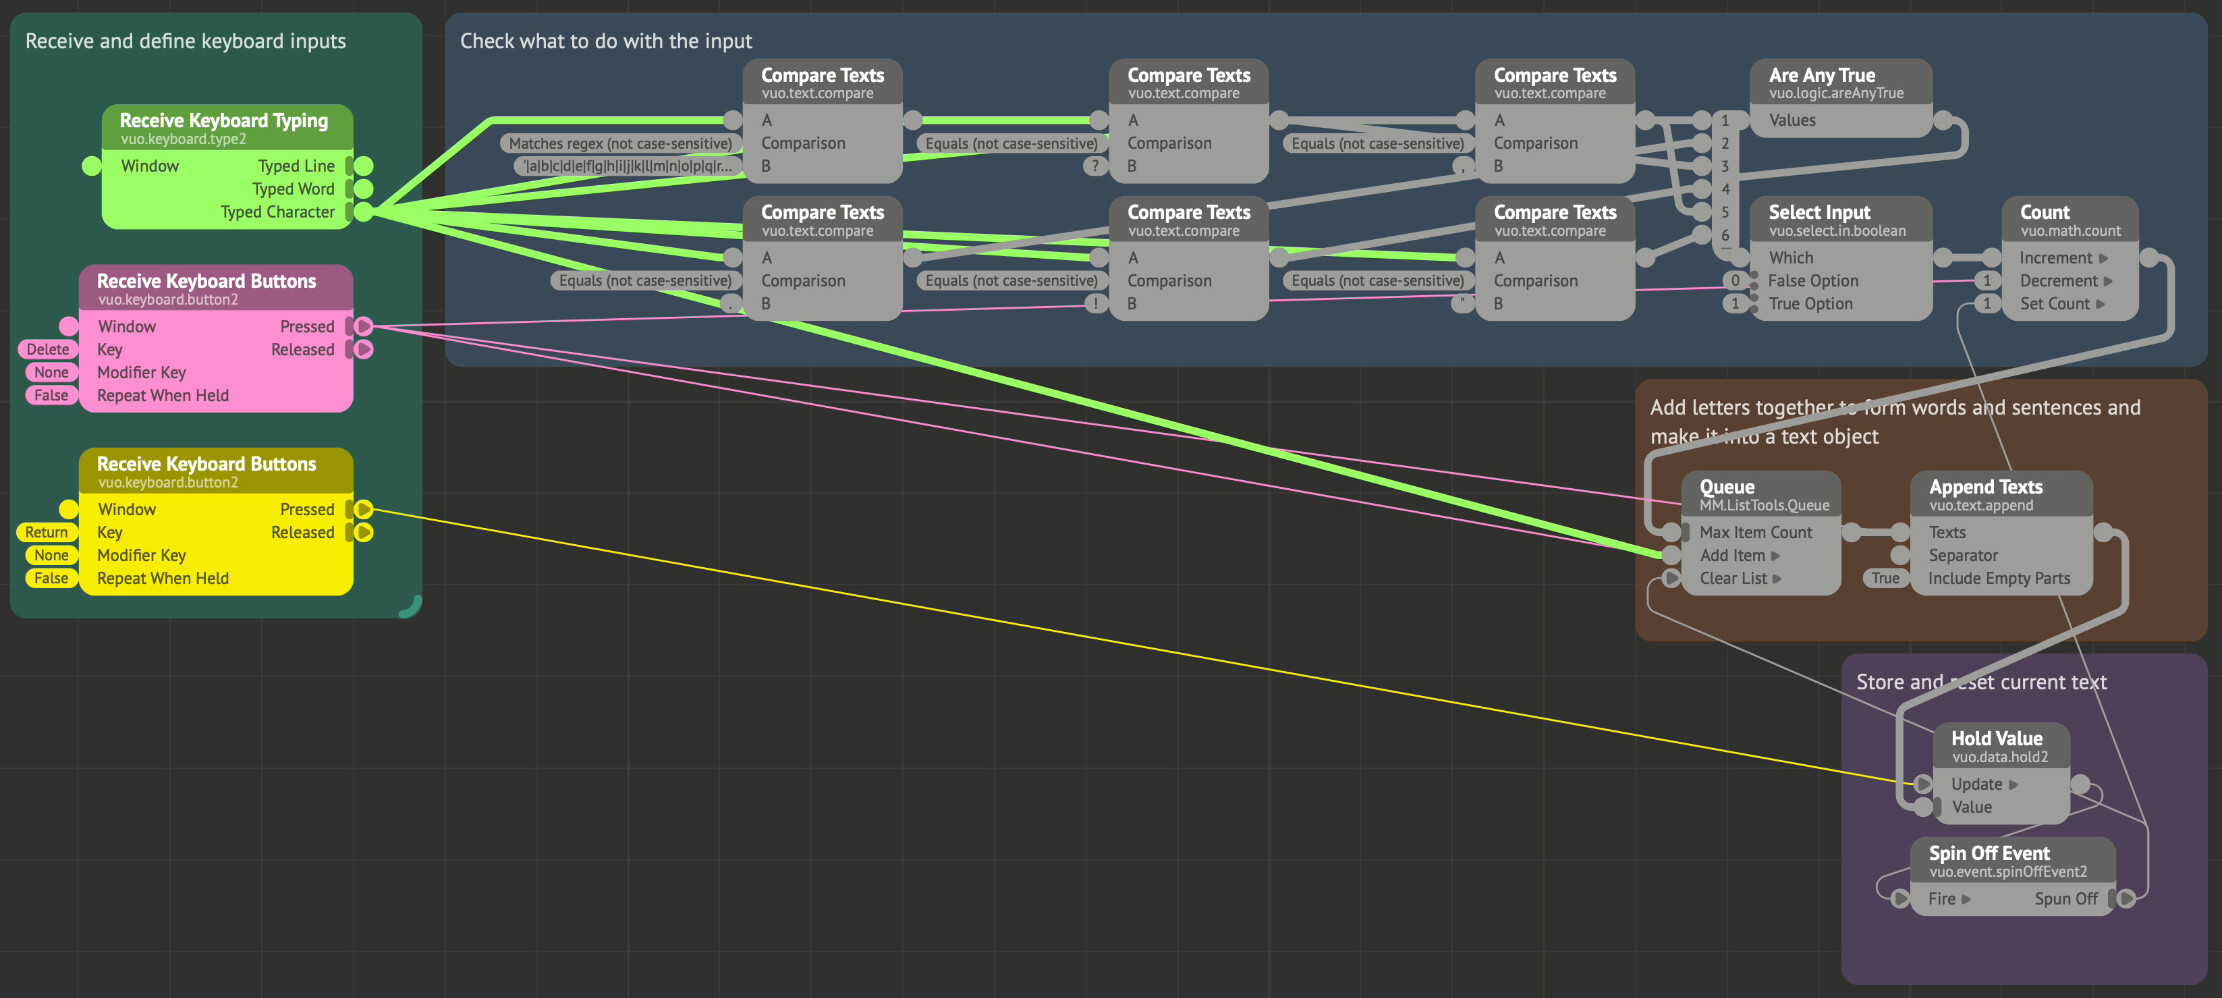
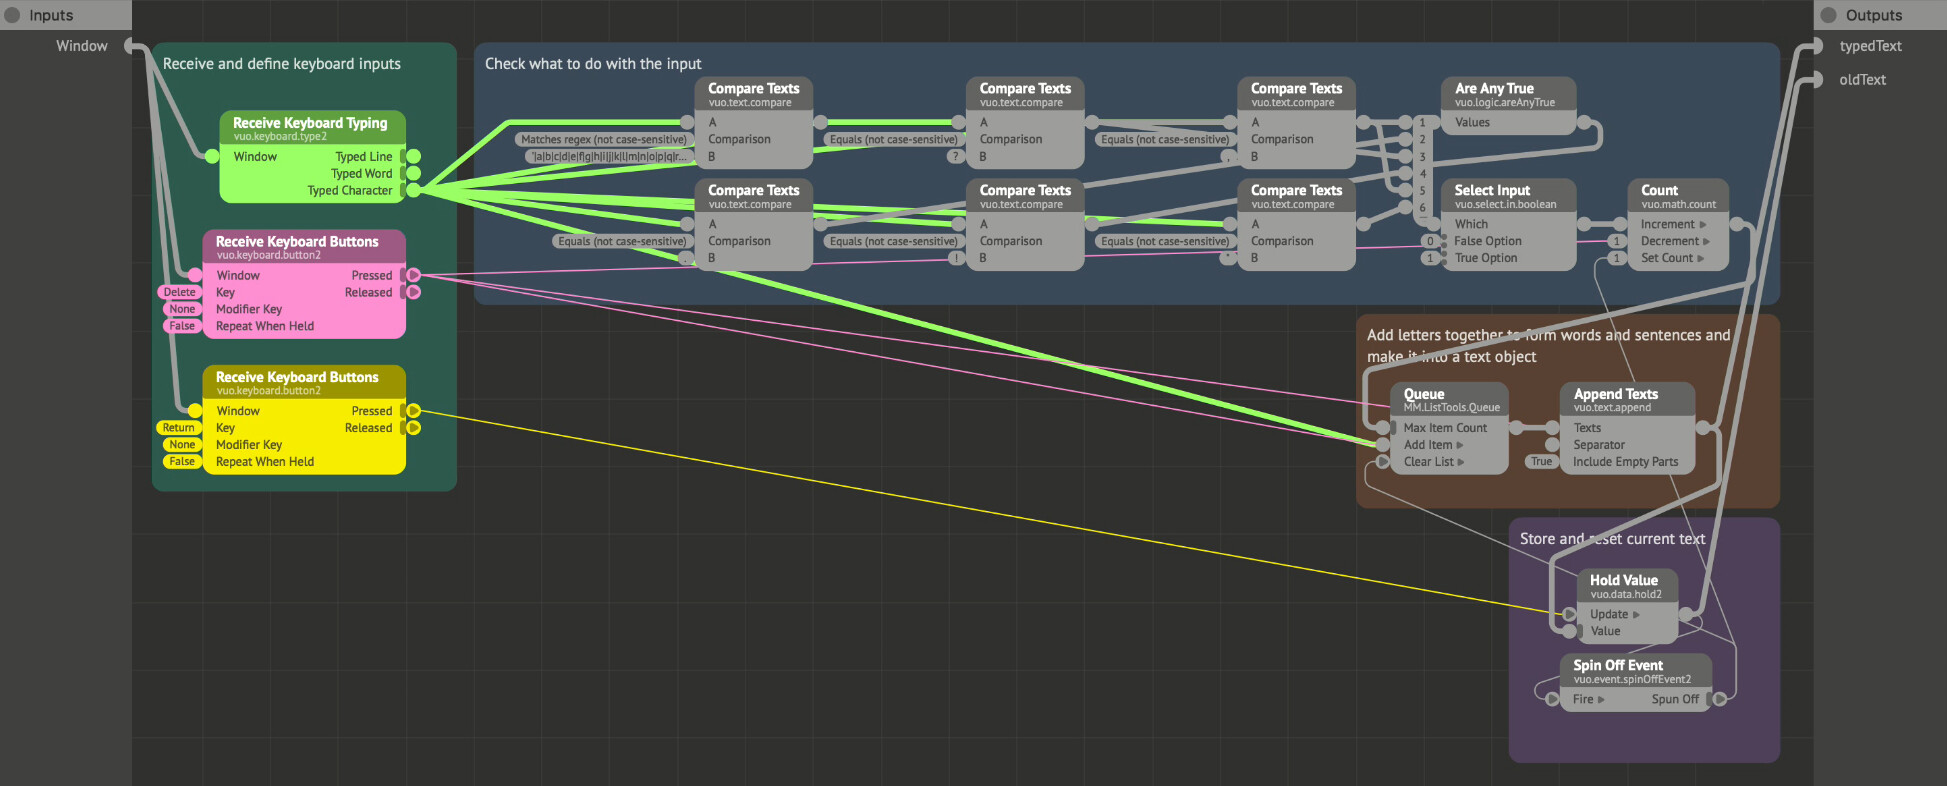
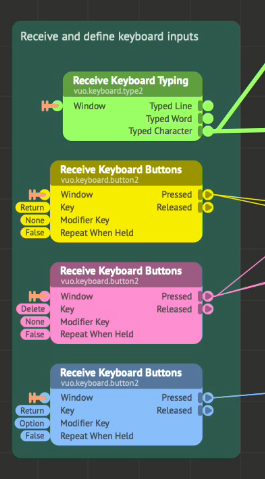
Starting off, we need some way to get keyboard input from the running composition. The nodes responsible for this can be found by searching for vuo.keyboard in the sidebar. This presents us with two options, where the main source of input for this application is “Receive Keyboard Typing”. This offers three ways to interpret keyboard data (I guess from a buffer somewhere). Here you can opt for “Typed Line”, “Typed Word” or “Typed Character”. Each of these has its own pros and cons. “Typed Line” and “Typed Word” are similar in the sense that they collect everything you type until you either press return (line) or space (word). Neither of these will provide you with realtime feedback on what you are typing though. That’s where “Typed Character” comes in, as it just passes along every button you press on the keyboard. The caveat here is that all key presses including return and delete are passed along which means we have to apply some filtering of the input data (@jstrecker; keys like these could possibly be filtered out by default? Or maybe the “Compare Texts” node could include a UTF8-hex mode?).

Knowing that we need to filter out some keys for this composition in the main input node “Receive Keyboard Buttons” comes in to play. This node is usually used for control applications. Here you can specify events from single buttons, or single buttons with modifier keys vastly expanding the amount of options for control of an application from the keyboard. I’m using these here to get back the functionality of pressing enter to end the line/confirm the input, and to get a way to erase text. More on that later.

KeyboardInput.png

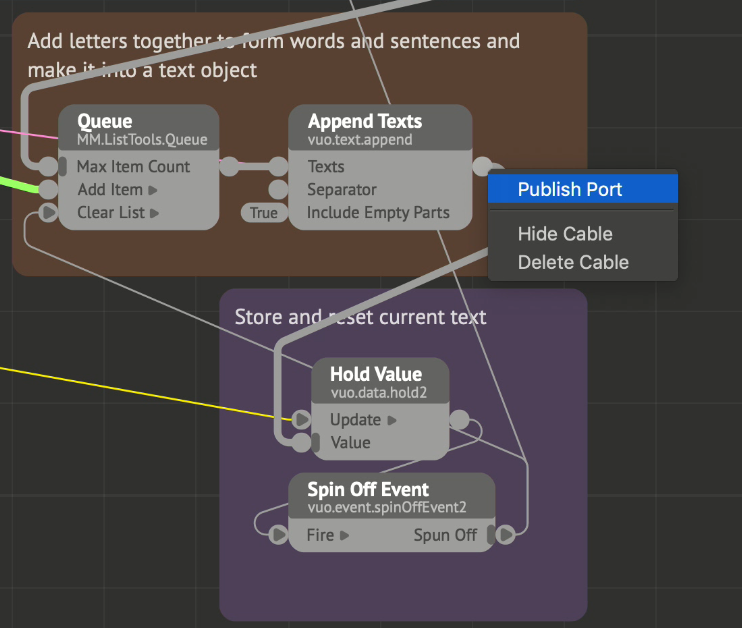
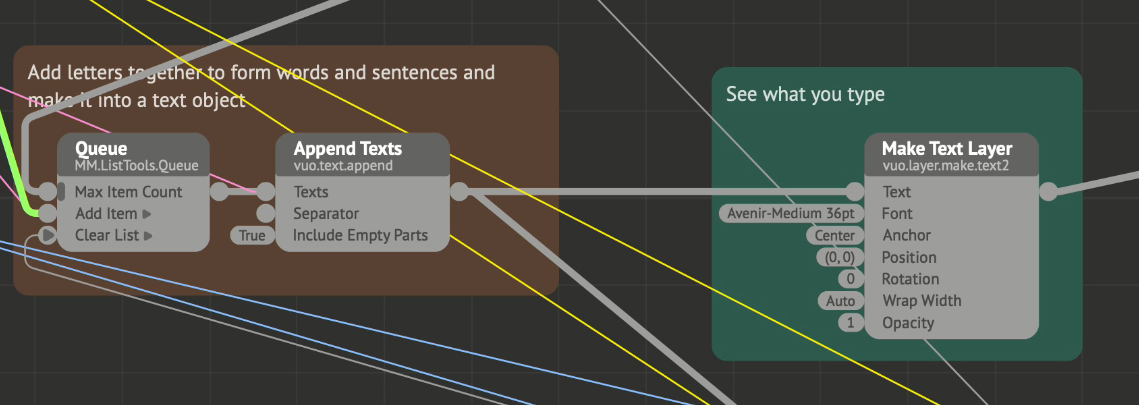
Before we move on to the filtering, we need to have an idea of how to collect and display all the key presses. As it is a stream of data, the “Enqueue” node comes to mind. This will not only enable us to collect each character, it will also enable us to ignore or delete a character and reset the whole input by adjusting the list length before feeding it to an “Append Texts” node. However, there is one glaring issue with this; it deletes based on the first character we typed not the last. No problem though, as the behaviour is changed by one word in the source code. The aptly named “Queue” node can now be found in my MM.ListTools node set. (@jstrecker; could this behaviour be defined/selected in the “Enqueue” node in the future?).

With that sorted out, we can move on to filtering. Basically we want there to be a bouncer at a gate that opens for our characters and increases the guest list by 1, and blocks the path with an angry stare and crossed arms if it’s something else. In computer we want to have a boolean TRUE if any of our key presses are of characters we want, and a FALSE if it is something else. If we search for “Compare” in the sidebar, we get the node “Compare Texts” which looks like something we should be able to use for this purpose.

Now, if we had to have a comparison node for each character, this would be very tedious and probably more than a bit ineffective. Luckily we can use the “Matches Regex” mode for the bulk of it which makes this a lot easier. For more on regex, see the Wikipedia article. For this operation we will only be interested in using the OR pattern. In regex this is defined by the character | (option + 7). There is a bit of tedium involved in typing a|b|c|… but a lot less than there would be if using separate nodes per character. When we have entered in our alphabet/character set, remembering to include a space for space (| |), we can feed the boolean output to a “Select Input” node. The FALSE option is set to 0, and the TRUE option is set to 1. This is again fed to a counter which is fed to the “Max Item Count” of the “Queue” node. What all of this effectively does is only increasing the size of the queue when there is a desired character, and blocking any expansion of the string if the character isn’t included in the filter. This also means that we can implement deleting of characters with a few easy steps.

Note that using regex disables you from filtering regex operators. This means that if you want to include symbols like !?() they will need their own comparators which can be combined with the regex one using an “Are Any True” node before going to the counter.

Now, to enable erasing of characters, all we have to do is connect the “Pressed” port of a “Receive Keyboard Buttons” node with “Key” set to “Delete” to the “Decrement” port of the “Count” node. To make it update properly, it will also need to trigger the “Add Item” of the “Queue” node and the “Texts” input of the “Append Texts” node. And that’s it for the pure input side of things.

FinalInput.png

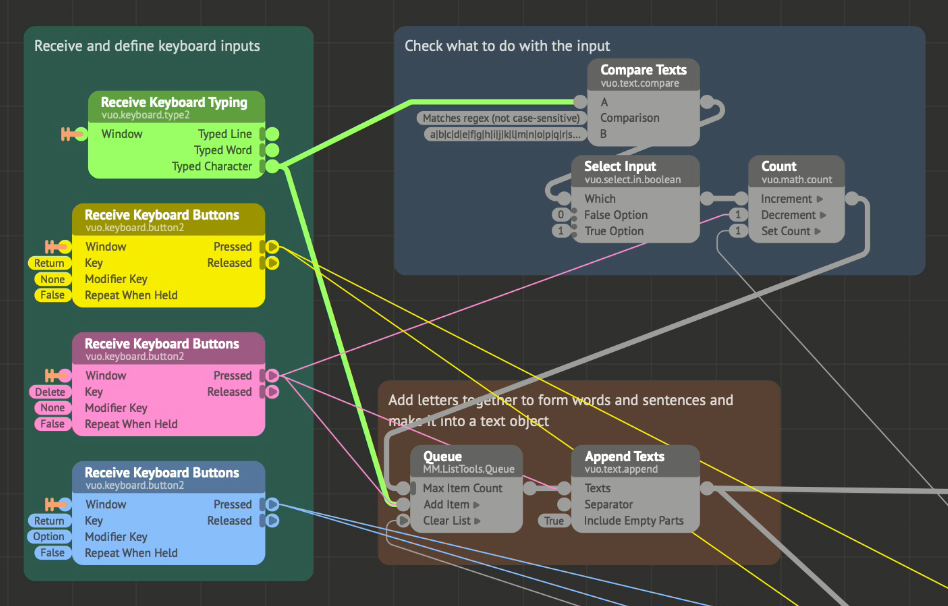
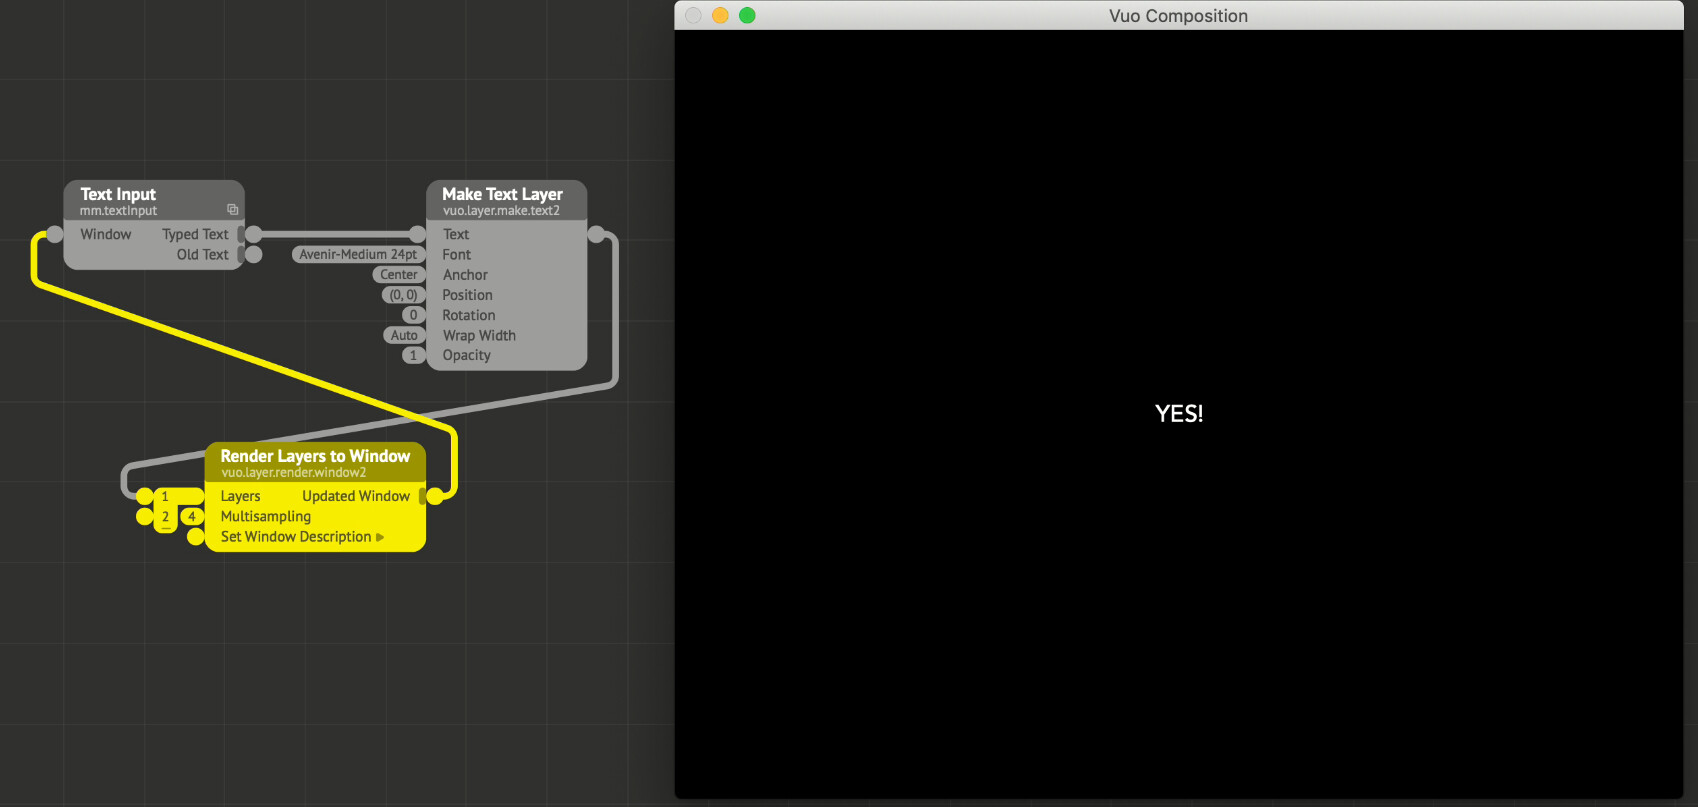
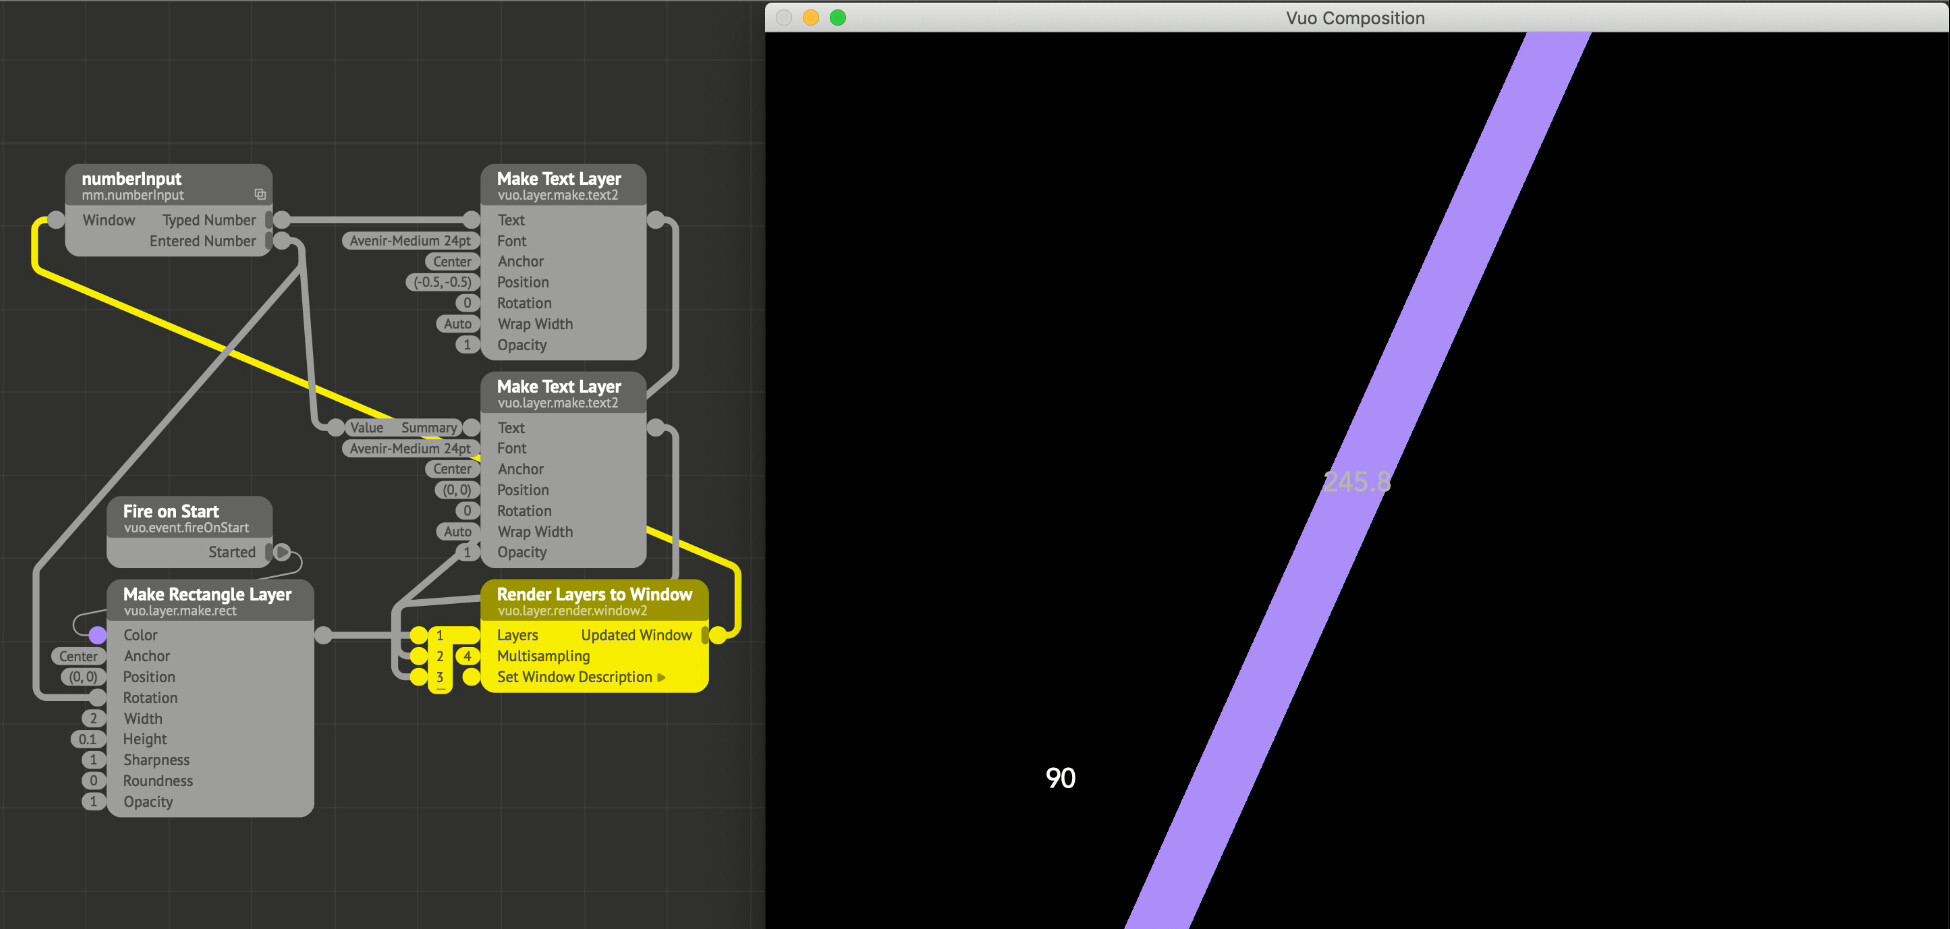
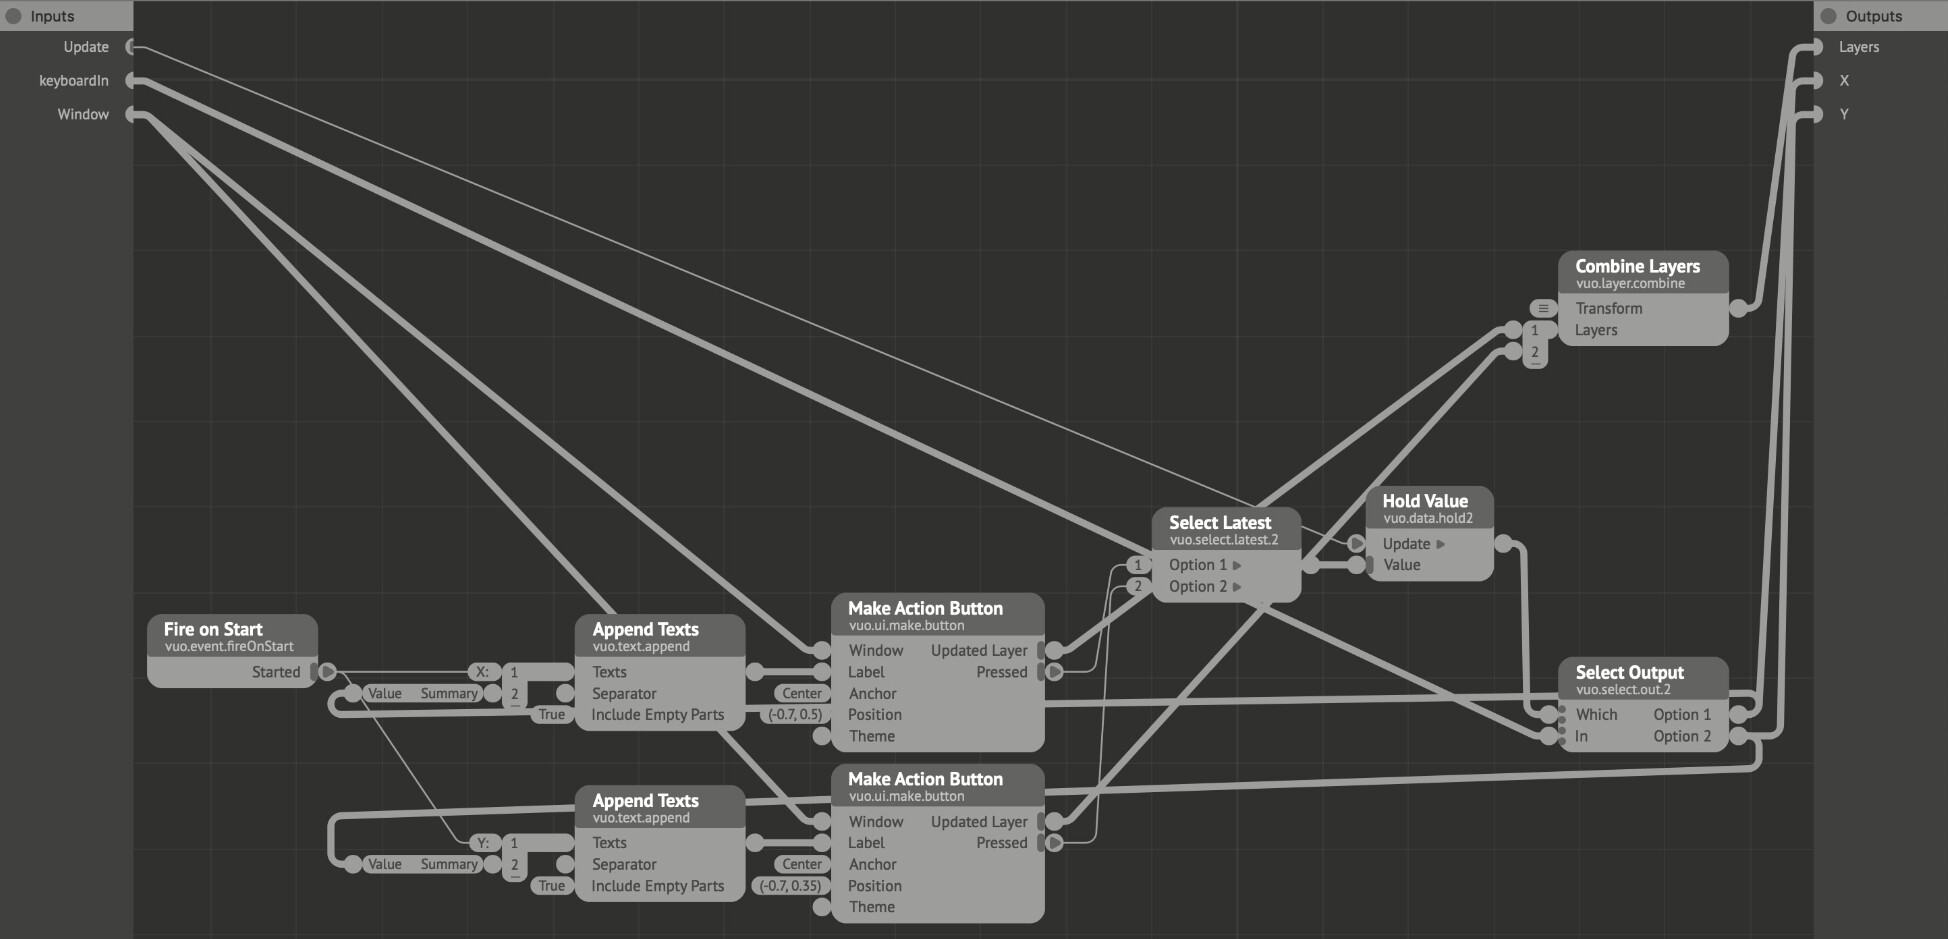
To view the input, add a “Make Text Layer” node, and connect it to the output of the “Append Texts” node.

ViewInputText.png

Next are the nodes to keep and process the previously entered text by pressing return and to initialize by pressing option + return. To do this add two additional “Receive Keyboard Buttons” nodes. Set one to trigger by pressing return, and the other to trigger by pressing return with option as a modifier key.

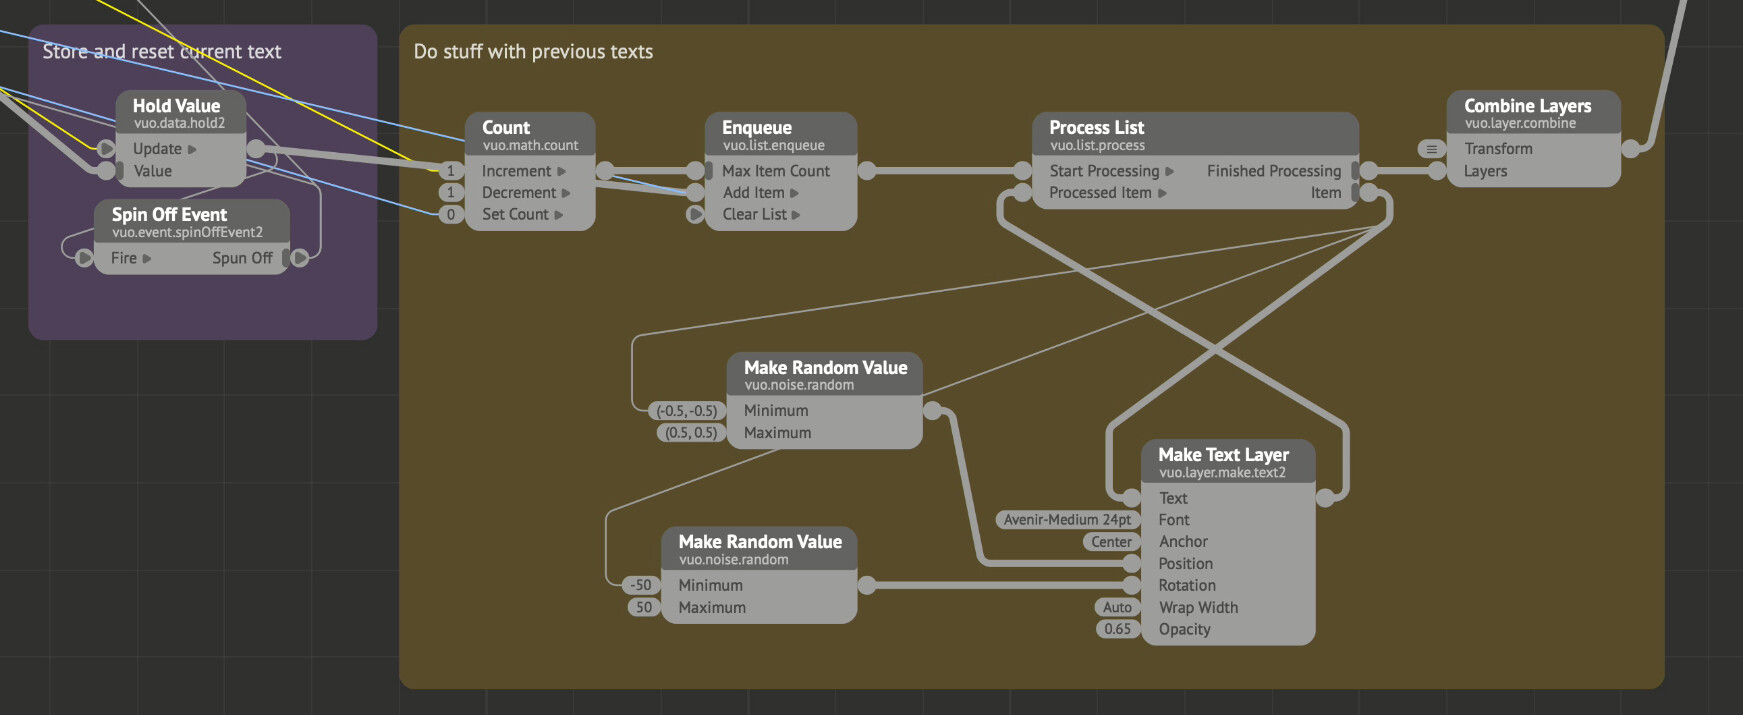
Next add a “Hold” node, and a “Spin Off Event” node. Connect the output of the “Append Texts” node to the “Hold” node’s “Value” input, and the return event to the “Update” port. Connect the “Spin Off Event” node’s “Spun Off” event to the previous “Count” node’s “Set Count” input with a value of 1, and to the “Queue” node’s “Clear List” input. This ensures that you send whatever is in the “Hold” node off to the next step before erasing it from the “Queue” node and resetting the “Count” node.

StoreDelete2.png

The output from the “Hold” node is now containing a single instance of VuoText. This can be stored to a table, a tree or a plain file, or as in the following example just be processed directly. Note that this will only keep the data as long as the composition is running.

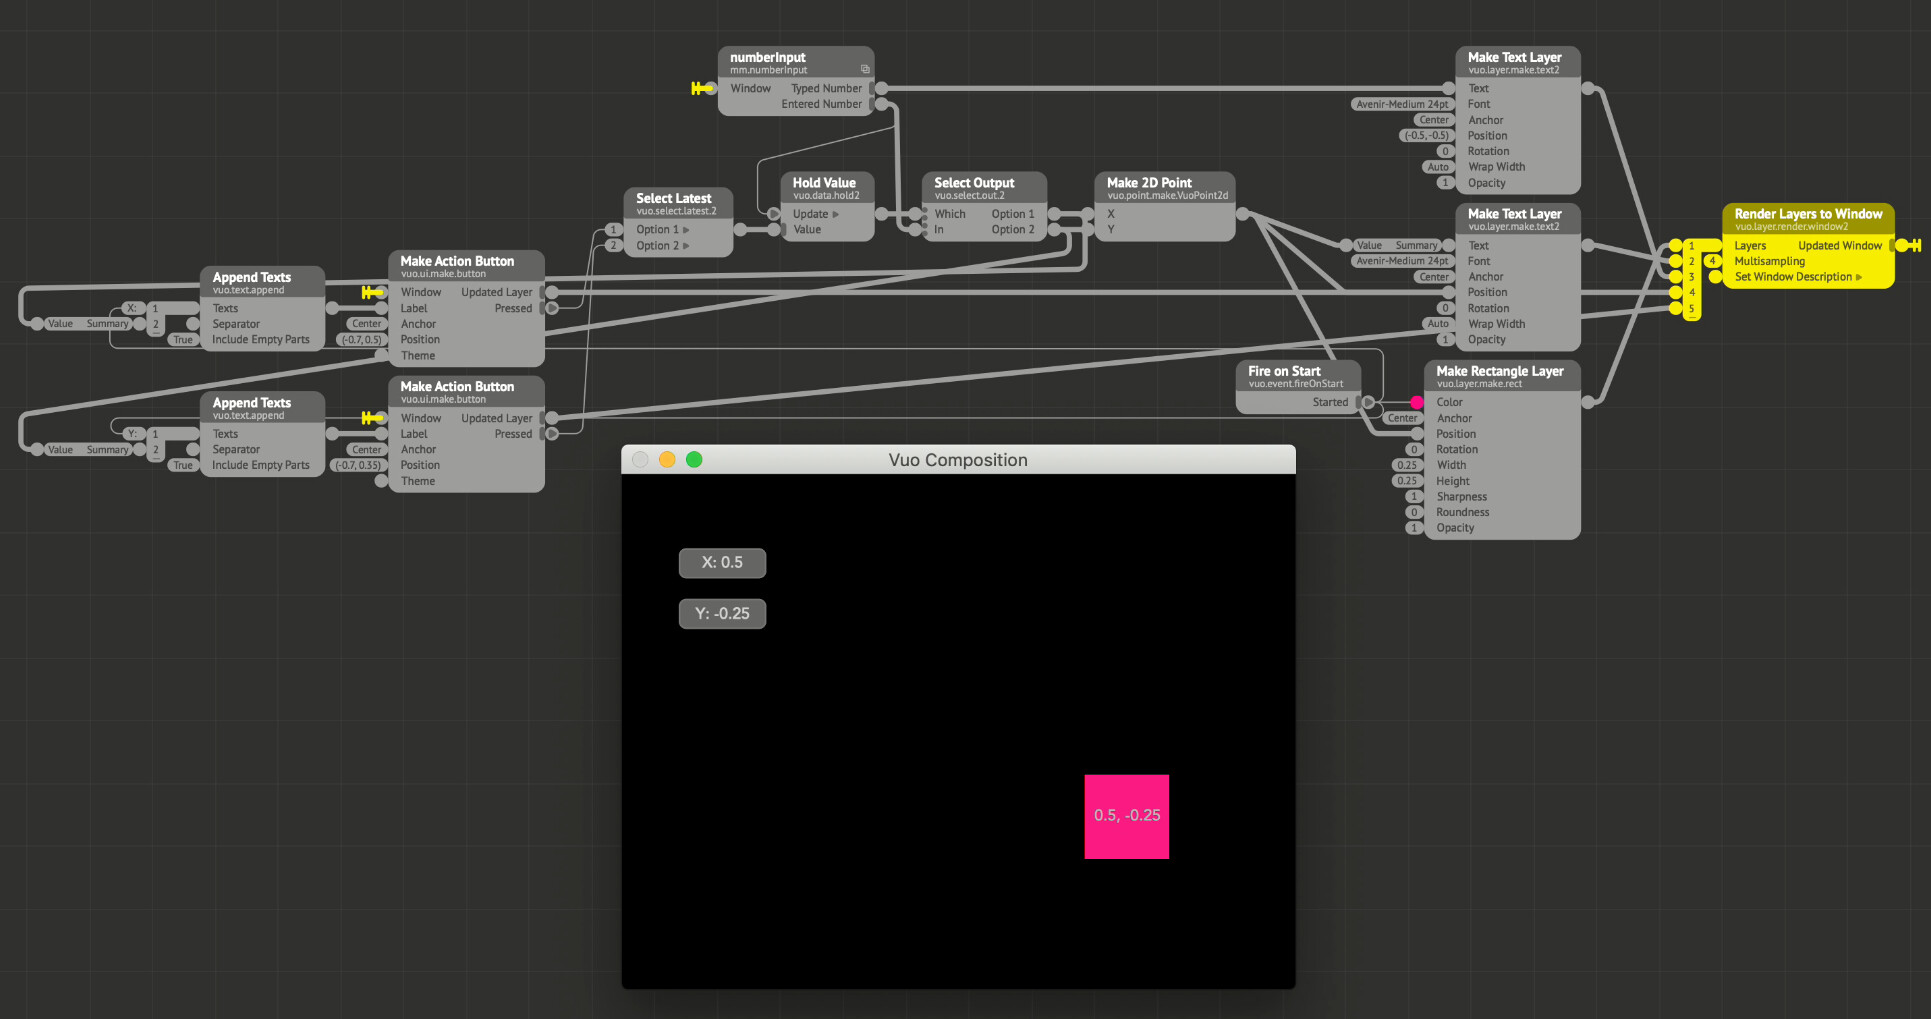
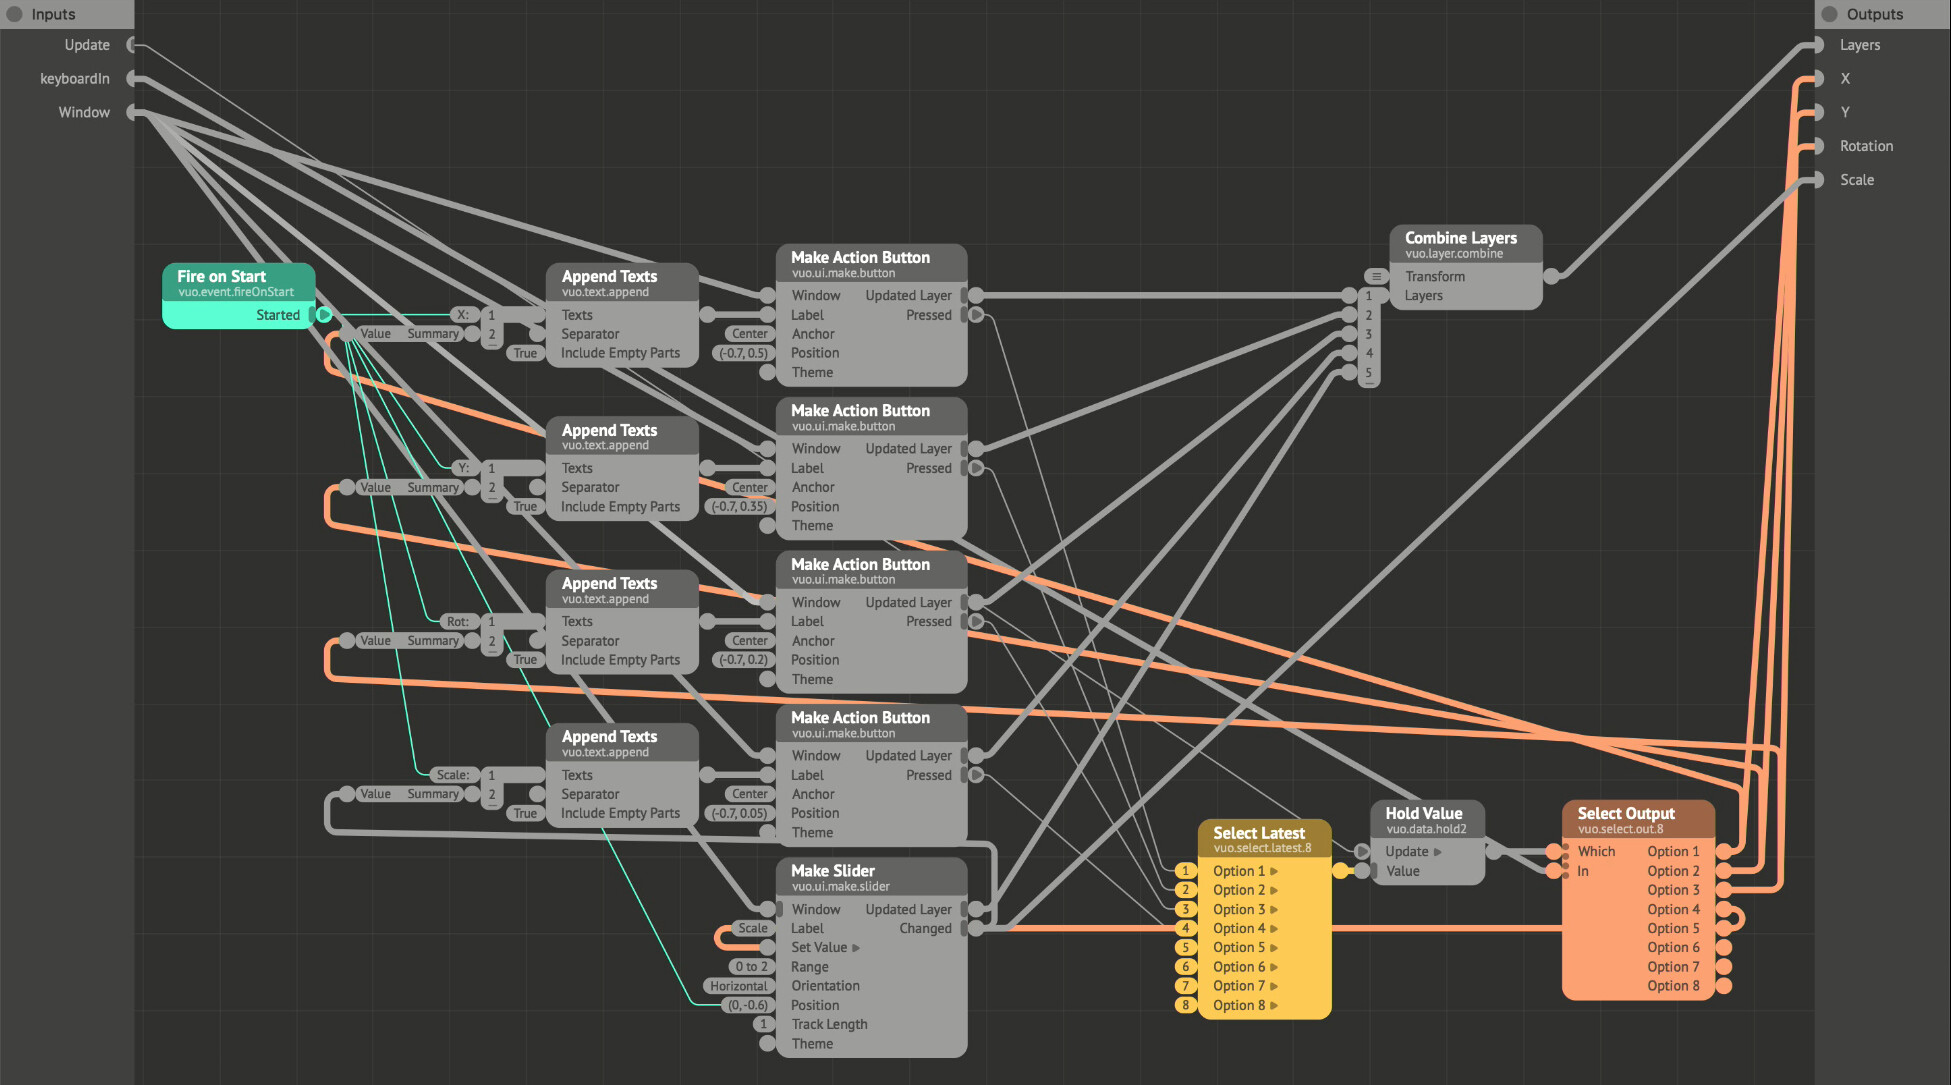
Employing the same trick as earlier, utilizing a “Count” and an “Enqueue” node enables us to have an arbitrary amount of items in a list, and being able to reset and delete. As this doesn’t implement erasing the last item, the stock node will do. This count node could also be omitted if a fixed count (for tiling for instance) was desired. The count here is increased by pressing return, and reset by pressing option + return. Note that the option + return event also have to be connected to the “Add Item” input of the “Enqueue” node to trigger the reset through those nodes.

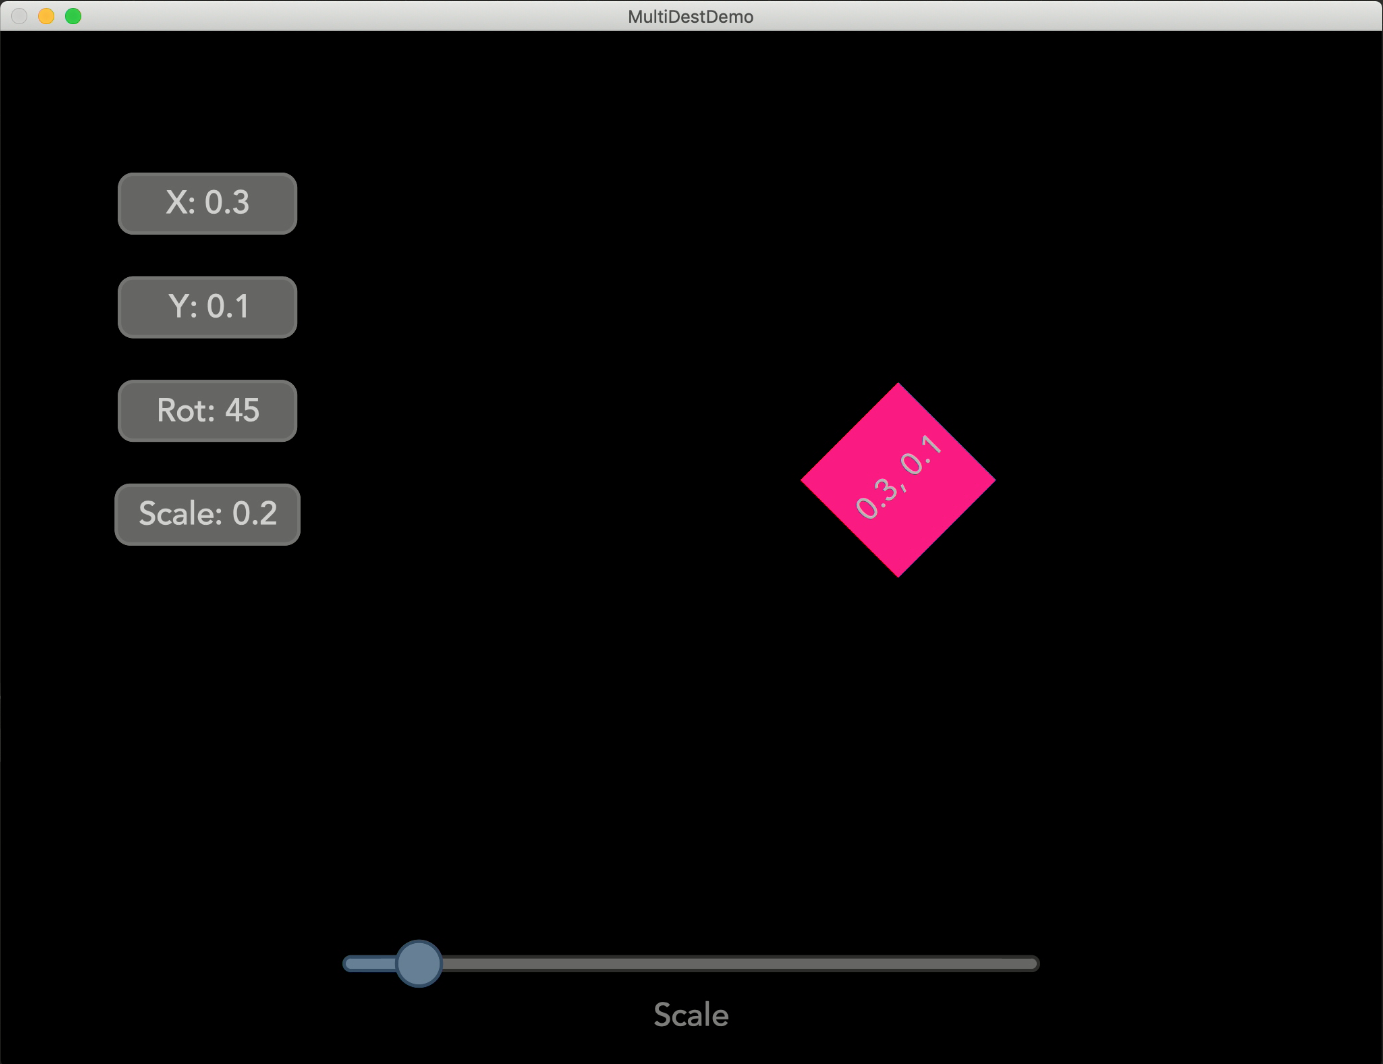
The output from the “Enqueue” node is now a list of VuoText. This can be passed to a “Process List” node where it will create a layer for each item in the list, randomly rotate and displace it, and then output it as a list of layers from the “Process List” “Finished Processing” output. These layers are then combined to one layer, and sent off to rendering.

Process texts.jpg

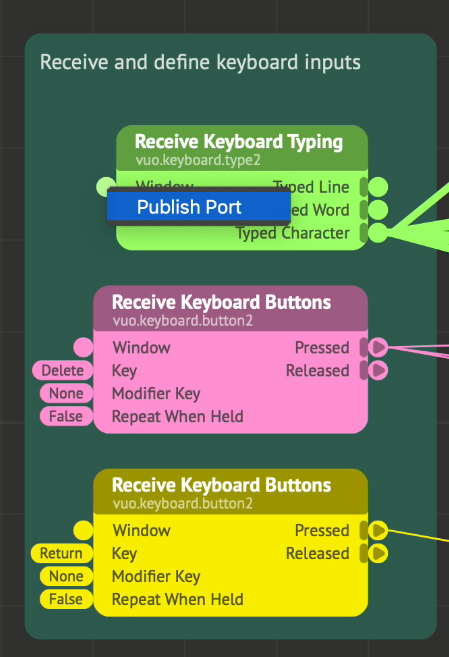
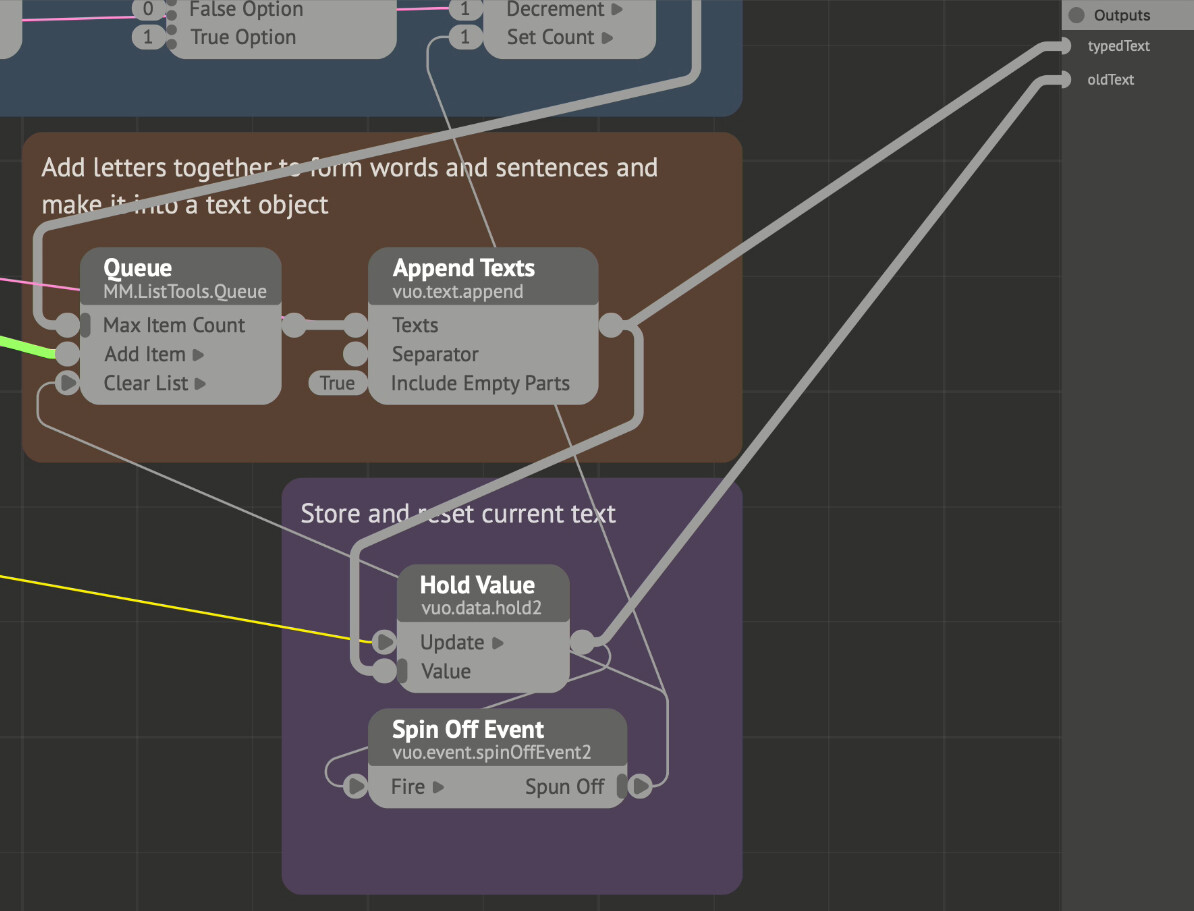
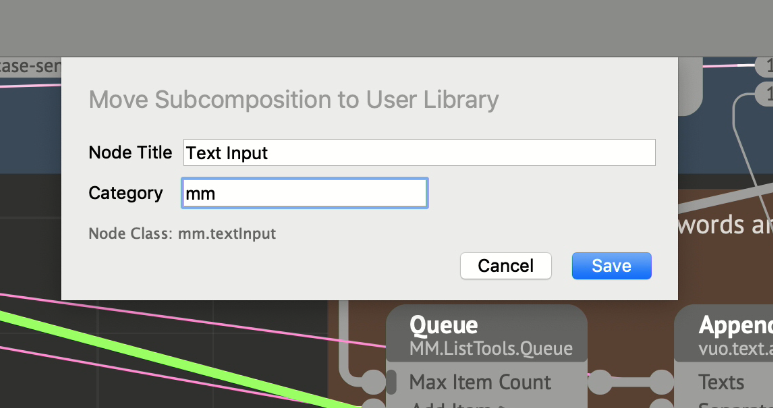
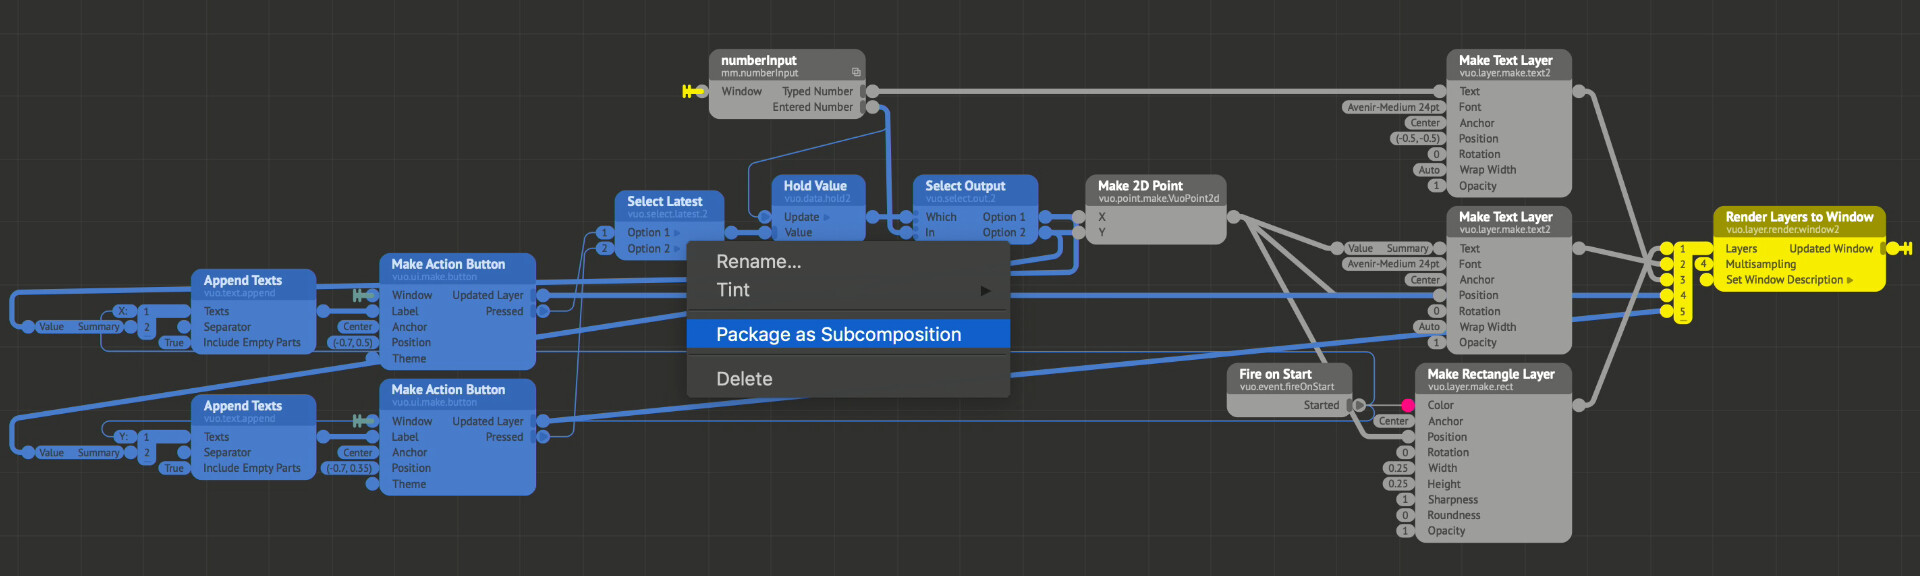
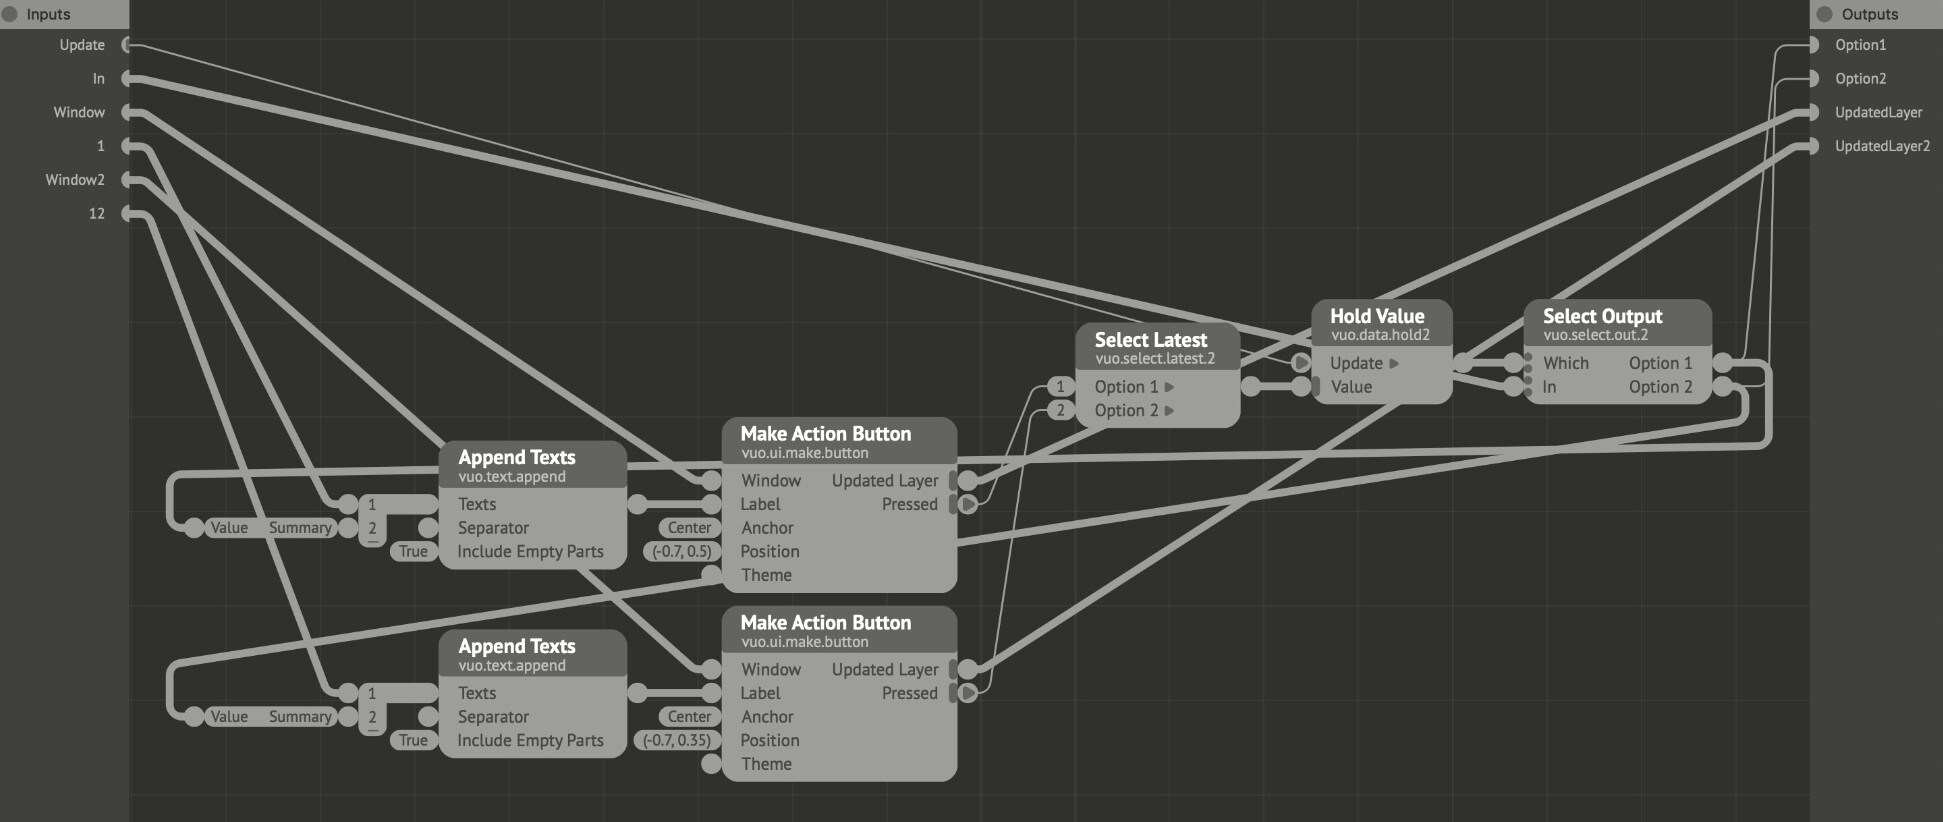
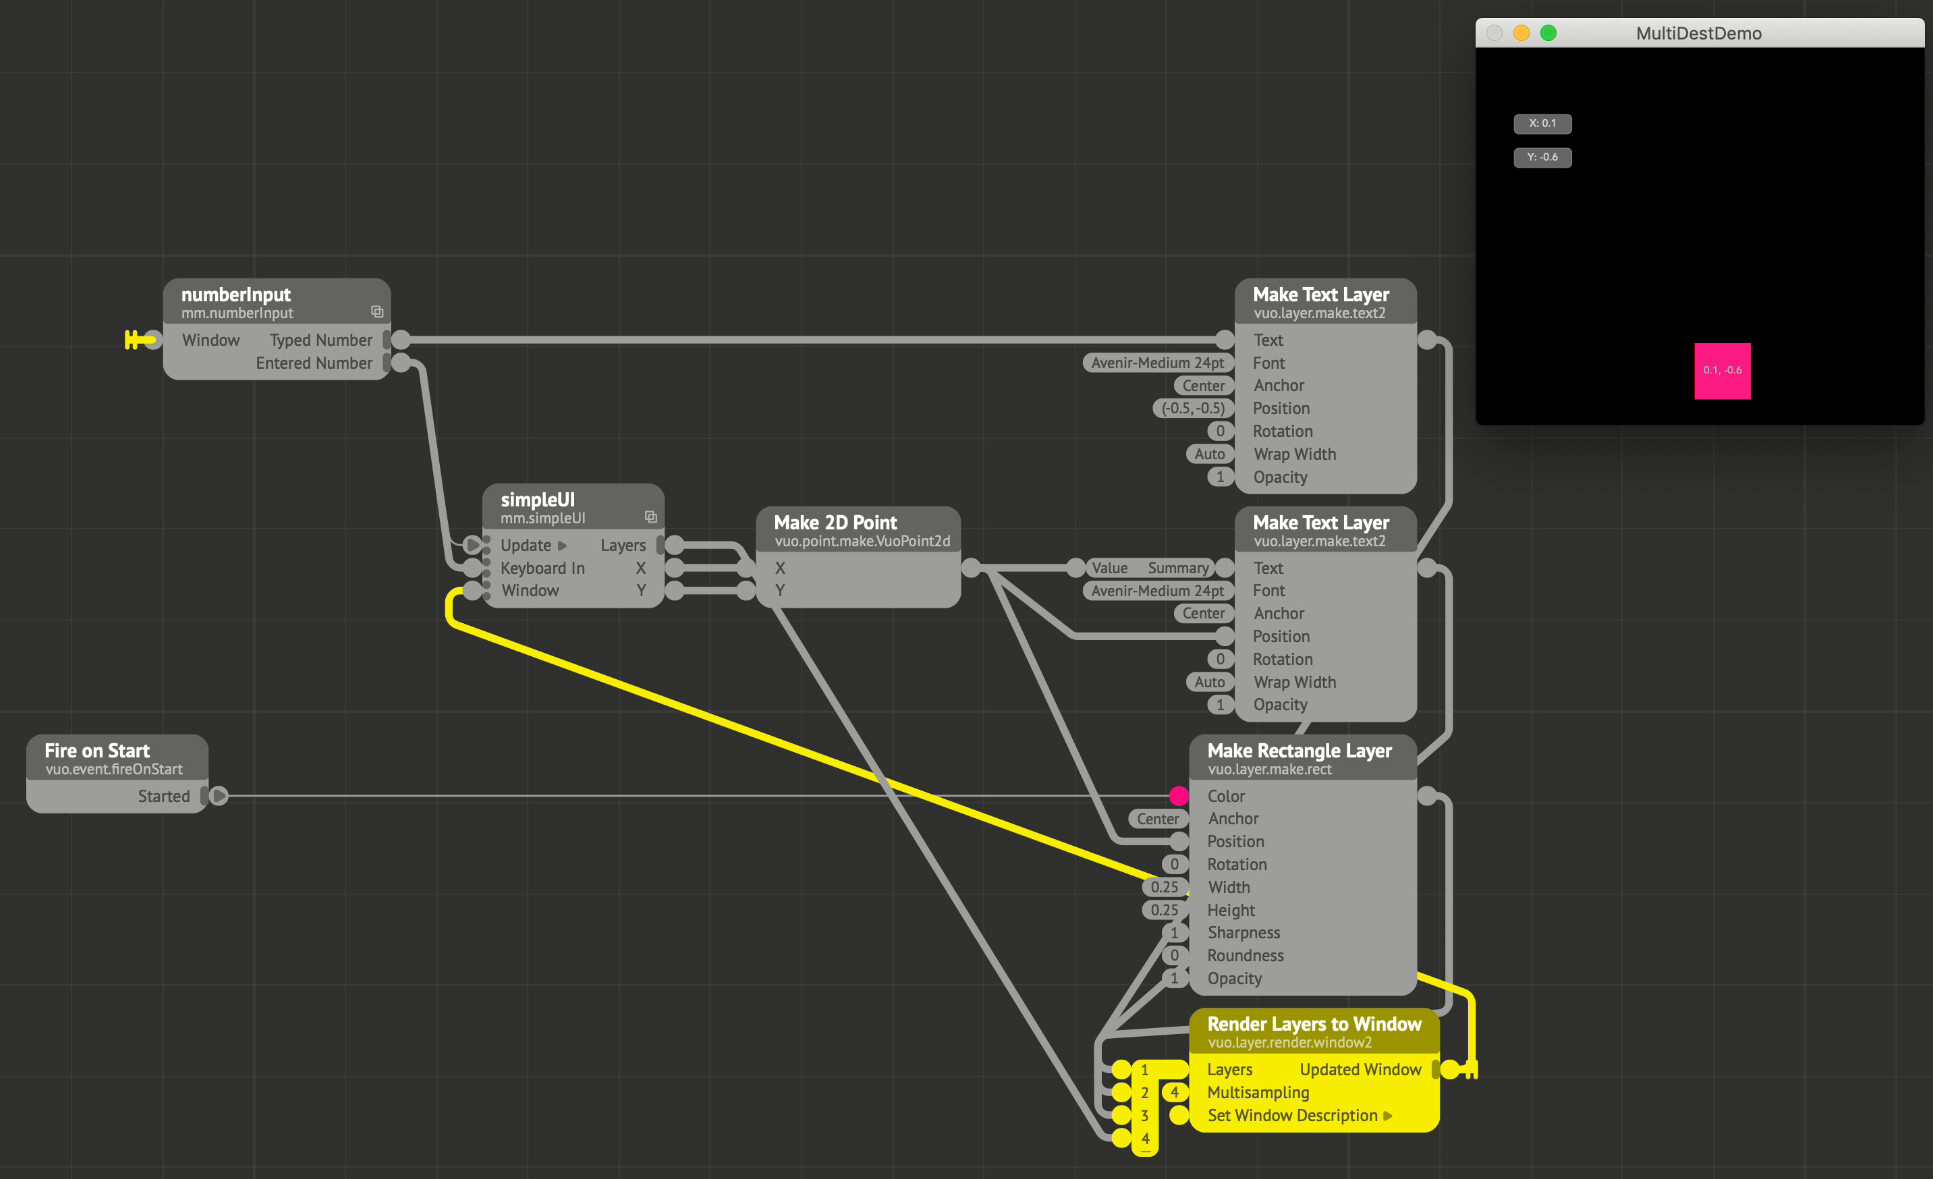
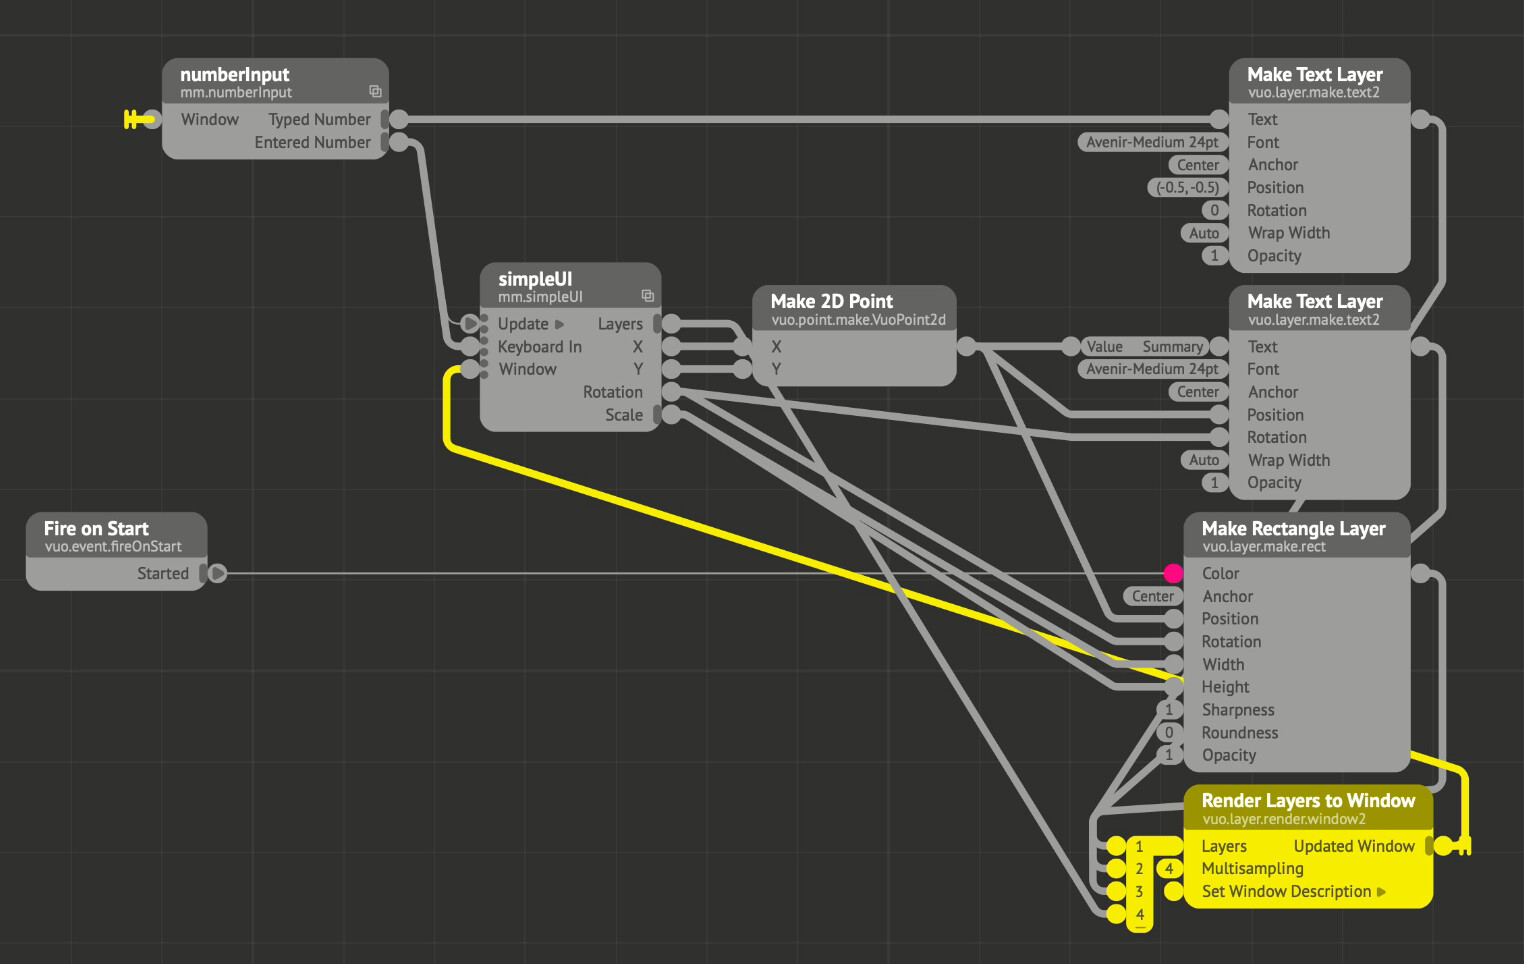
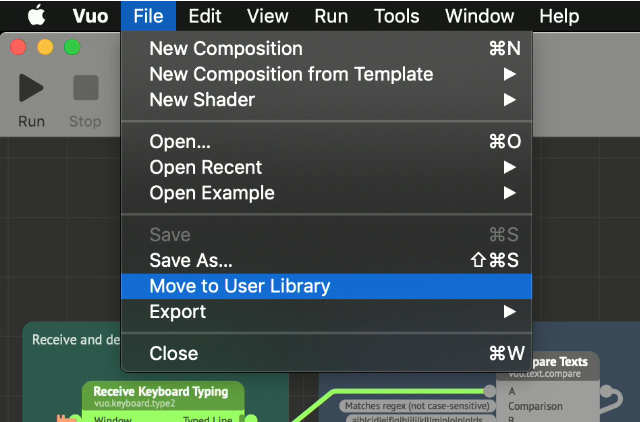
When this is all done, a quick tip would be scrapping what’s not needed from the example, publish an input for the “Window” ports and an output with the desired text object. Save the composition, move it to the user library, and you will have this as a node to use in your projects without having to set it up again.

SaveUL.png

There are probably a few things that can be improved in this composition, the counter can for instance go to the negative range if you press delete enough times, and sometimes you have to hit delete twice for it to start erasing. It might be me not setting it up right, although I assume this is a 0/1 issue with the list and what event going where first. Anyways, it is text input to a running composition. It has been available for quite some time, and it is more flexible than fixed nodes. Happy typing!

Oh! And get the example composition here!

RenderedOutput.jpg

1 Like

How to make a User Library input node

Starting out where we left off in the last post, we want to condense our input node to the essentials for a general input node and add it to our User Library. Marked in red are the composition specific nodes that won’t be needed for this.

compositionSpecific2.jpg

Mark it, delete it and end up with this:

necessaryNodes.jpg

Right-/two-finger click on the “Window” input port of any of the “Receive Keyboard Typing” nodes, and press “Publish Port”. Connect the two other “Window” inputs to the same port.

publishPort.png
allWindows.png

Go over to the “Append Texts” node, and repeat the operation, but now for its output port. Give it a suitable name like “typedText” (capitalization indicates spacing in the output naming of the node).

typedText.png

Repeat the operation for the “Hold Node” and name it something suitable like “oldText”.

publishedOuts.jpg

Save your composition, and go to File → Move to User Library. Give it a suitable title and prefix (hopefully something else than mm as this is the identifier for what I usually publish publicly), and press save.

moveSubcomp.png

Make a new composition, and you will find your subcomposition in the Node Library!

nodeLib.png

Does it work?

finalOutput.jpg

How about repeated inputs?

oldText.jpg

Final subcomposition found here  

But when I said “Text Input” I really meant an exclusive number input! And now people are entering in letters where I only want numbers :(

Relax! Remember that regex filtering used all the way in the beginning? We can now use that to our advantage to filter out anything but the numbers and separators we want for a number input. Best of all, we now have a working template for this in the Node Library. With that in mind, open your “textInput” node and “Save As” “numberInput” or something else that makes sense to you. Note that saving as before editing anything makes sure you don’t fudge your text input node. I prefer saving it to a different destination than the UL while editing, but I don’t think it would make much difference practically speaking.

Starting out with this, we can look at what to change to get our wanted result:

NIStartingPoint.jpg

The comparators are an obvious place to change. The “B” input of the “Compare Texts” regex node now only needs to contain the numbers 1|2|…|9|0. We can also remove the other comparators except for . for real numbers. If you only need integers, all other comparators than the regex one can be removed.

filterNumbers.jpg

Next we can change our output naming to reflect this being a numbers node. We can also sit back and reflect on if we want the numbers to change our target while typing, or if we want to delay it until return is pressed. I landed on the last option. Because of this, I attach a “Convert Text to Real” node only to the “Hold Value” node’s output. I then delete the previously published port from that node, and publish the port from the convert node instead. This is to ensure that the published output is a VuoReal output, and not a VuoText output. The already published ports won’t change their type, but add a conversion if you were to connect a different type node to them. The composition now looks like this:

NumberInputDone.jpg

Now you can save and move it to your UL as described in the previous post (but with a different name), and you have an exclusive number input node in your Node Library!

numberControl.jpg

Final subcomposition found here  

Rotation is so booooooring! I want to be able to enter positions! (I.e. multiple inputs).

Now, this is where it all gets a bit more exiting. First we have to do some gymnastics - luckily in the mental way. The thing is we don’t have multiple inputs. We still have our one window, and we still only have our one keyboard. That means we have to turn around the issue. We don’t have multiple inputs, but we can have multiple destinations from the input node. One way to do it is by using the “Select Latest” node in combination with “Select Output” and the “Action Button” from vuo.ui. Along with a “Hold Value” node to ensure we only send the value when we press enter to the desired destination, we get something like this:

BaseExample.jpg

This can of course get unwieldy if you want to have a lot of on-screen control. To get around this, you can mark the relevant nodes, and right/two-finger click to get the option to “Package as Subcomposition”.

packageSubComp.jpg

You can now give it a suitable name, and edit it in a separate window.

SimpleUI.jpg

Now, the auto generated composition is pretty much a mess. It has taken all inputs and made separate inputs for them, and also done the same for the outputs. First steps is then to clean it up, delete and republish relevant outputs, consolidate inputs and outputs, and give everything a meaningful naming scheme. We then have something like this:

cleanSubComp.jpg

Upon saving, our previously cluttered main composition now looks like this:

CleanComp.jpg

If you suddenly then find yourself wanting to rotate again after getting a bit tired of moving things around, this is of course no problem. In our simple UI, node destinations are decided by action buttons and selector nodes. These come in flavours of 2 or 8. To get more control points, swap out the selectors, and add what you need. Although they support up to 8 inputs, you don’t have to use all of them. In addition, other UI elements can be combined together, like for instance a slider for the scale that can also be set to an entered value. The simple UI composition will then look something like this:

notSoSimpleUI.jpg

While our main composition looks like this:

BaseExampleMoreUI.jpg

And our running composition with an UI looks like this:

UIOutput.png

Hopefully these posts will now have enabled you to see what you can get out of Vuo with an UI, and given you some inspiration to create. Subcomposition editing might seem daunting at first, but with instant updates to the main composition when saving it is really a great tool. Used properly it may declutter both visually and mentally when working with compositions, and the re-usability of node-snippets become apparent.

Final subcomposition found here  

Thanks bro !
Is it possible 2 images are missing on the first part ?

1 Like

Yes! I left it open over night so something happened to the images I uploaded. It might have had something to do with that. Thanks!

@Bodysoulspirit

I got a bit lost between the different subcombs and how to use them, but thanks to you, I was able to tweak your original composition to match my needs, use some buttons yeah to use as some text fields (clicking a text field resets the field however) (see joined composition below).

I see I might have to clear up the part with button naming since I didn’t really explain why I piped the numbers back to the buttons. It was just used as a simple indicator of the current value. If I understand you correctly you want to relabel buttons on the fly?

To do so you would have to add an intermediate step where you have a button that redirects the output from the button to enable renaming of the button. Without this step, the only function of the button is to rename itself. I will strongly encourage you to try to go through the subcompositions again, and I’ll try to answer you if you get stuck at some point.

I’m not sure if it is beneficial to use buttons in a scenario like this though, you might be better off with lists and clicks on layers. Can I ask what your end-goal is?

Thanks Martinus.

I don’t have an immediate need, I just know sometimes I’ve wanted a text field UI also, and with your help we’re able until it’s implemented.
The use for buttons was to make it more text field like (a box), compared to simple text, but you’re probably right text is easier.

Cheers

Thanks for your work making this tutorial @MartinusMagneson

It got me thinking about using Siri as an input for the text field. Have you ever tried anything with voice recognition, anyone?
I got about as far as the theory of how would you split up the input into individual lines? punctuation? and how to potentially represent a conversation…? then I got stuck. Â