Blending, masking, and putting together ideas — by Vuo community member @MartinusMagneson
Transcript
Moving on from Part 1, we should now be in a position where we have an overview and control of the flow and scale of our composition. That means it’s time to have some fun!
Compositing itself is the art of putting together ideas. This could be clothes, music, edible arrangements, a city — or a combination of all those for that matter. At the core, it would be a presentation of your idea of something that you find cool and worthwhile through the environment you work in. To get an idea of the ideas currently being discussed in the visual realm, there are a lot of great YouTube channels that will show you compositing and creation in applications like Photoshop, Affinity, Cinema 4D, Blender and so on — just by searching for “how to create…”. Also, Bob Ross. Trying to implement ideas from other environments can not only be a source of inspiration, but also a great learning resource.
While the idea of something can, has and will be discussed until at least the end of our time — the time frame for discussing the environment you work in; Vuo, is at least not that expansive. There will nevertheless be a certain amount of time involved to learn to know the environment and get a grasp about what the different nodes do.
While learning the names of all the individual nodes can take quite some time, a quick tip is to utilize the node naming scheme to quickly sort nodes by category. If you type “vuo.” In the search bar all nodes from Team Vuo will show up. Likewise, if you type “mm.” in the search bar all my nodes would show up if you have any of them installed. This can be narrowed down further by typing for instance “vuo.image” that will list all of the built-in Vuo image nodes, and so on. When you have learnt a few node names, a fast way to get to them are by partly typing their names. “Re la im” will send you straight to the Render Layers to Image node for instance.
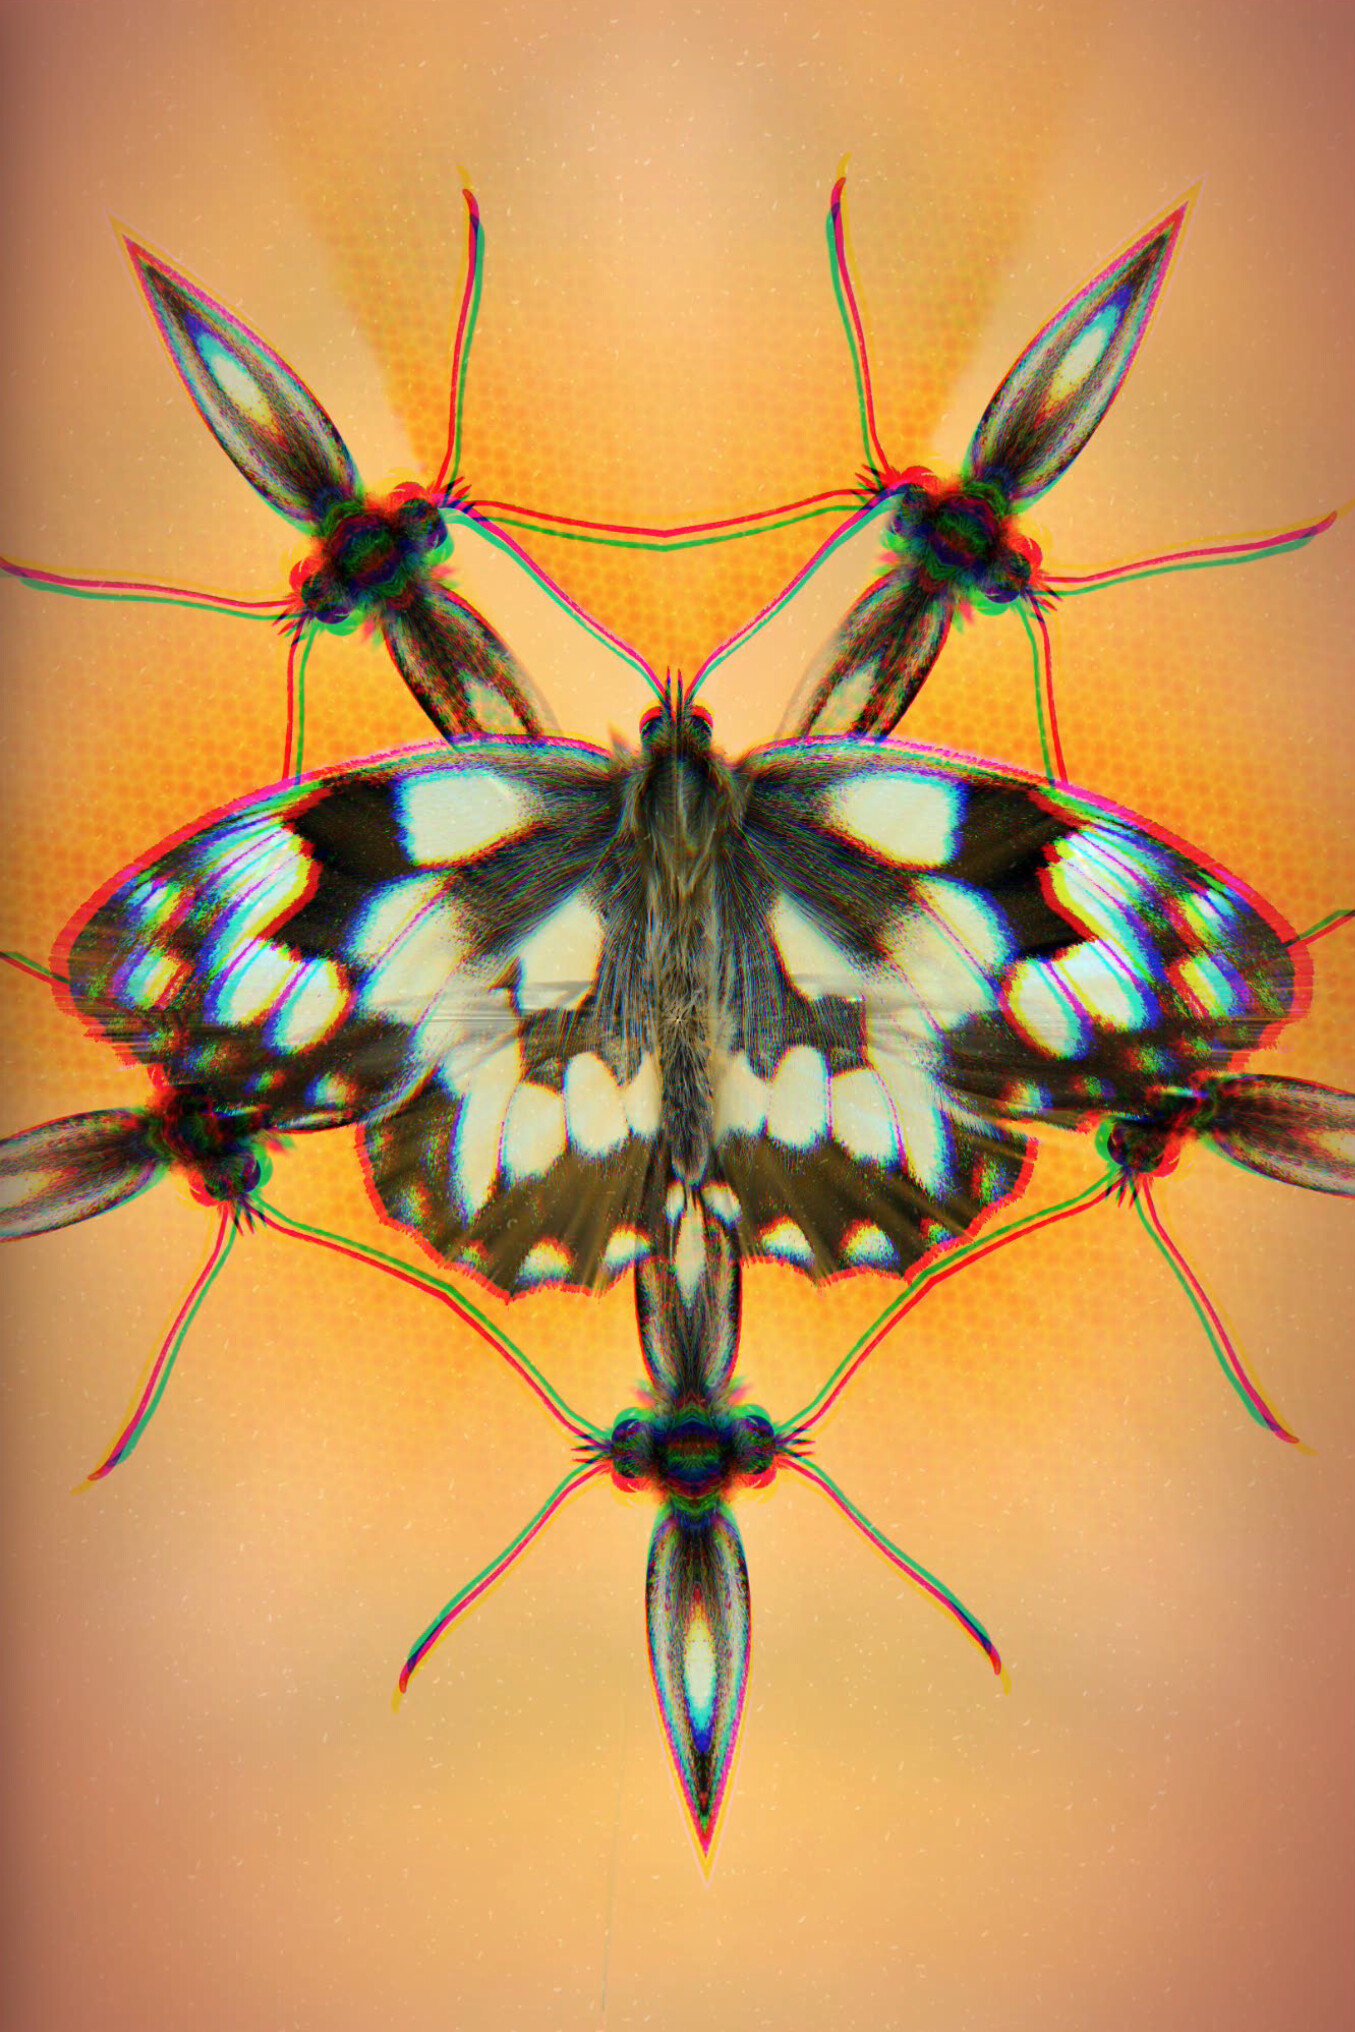
Philosophical waxing and library search tips aside, the result of my idea of something for the butterfly image can be seen in Figure 1.
The general idea was to have some kind of animation on the contours of the butterfly and add some background elements.
As my workflow is a bit dependent on looking at what works in an organic way while building the composition, this will be more of an explanation of the finished flow rather than a step-by-step.
If you have any experience with photo editing software, Vuo can be used as a live version of for instance Photoshop. The layers and masking will work a bit different since you are not restricted to separate realms of existence for these, and they can be used interchangeably as masks and images.
Since the butterfly itself has a pretty clear outline to a very blurred background, the first thing to do is to create an outline image to further use as a mask for the butterfly and the surrounding elements.
For this application I used an Outline Image node to get the contour, then blurred the result to feather it, and then blended it back with the original image using the Blend Images node with a blend mode set to Darker Components to get rid of some background noise. Then I desaturated and added a bit of lost intensity to the result using the Adjust Image Colors node. The result being a base for our masks.

The Blend Images node is a key element to successful image and video manipulation in Vuo. It can be seen as something comparable to the layer control in Photoshop, where they can be stacked to create a layer hierarchy with different blend modes. This must not be confused with the concept of layers in Vuo though and should not be referenced to as layers when talking about image stacking in Vuo.
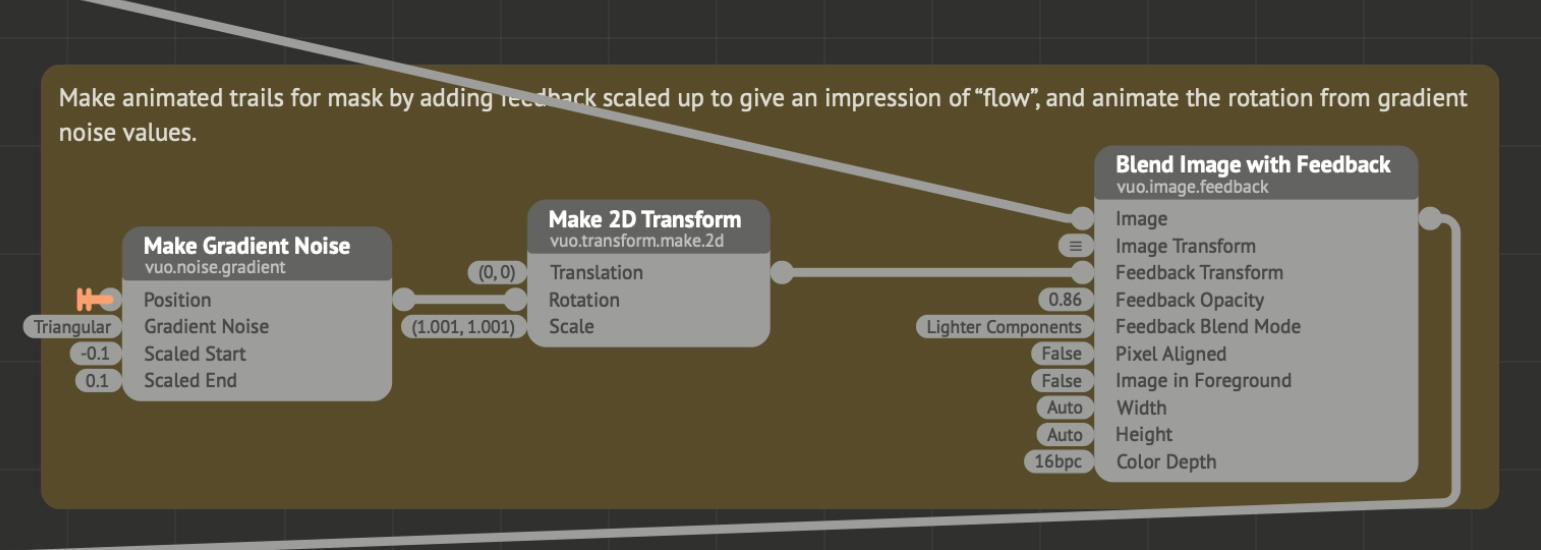
With our base mask from the previous step, we can feed it to a Blend Image with Feedback node. This node blends the current rendered frame with the previously rendered frame and creates a feedback-loop like pointing a camera at a screen showing the camera stream. By adjusting the Feedback Opacity, we change the amount and duration of the feedback. In combination with the Feedback Transform input this can create some interesting and computationally cheap effects.
With that in mind, using the transform to scale the image slightly up, we should have something looking like flow coming from the contours of the butterfly. As the feedback flow becomes more like a static gradient when it has scaled enough to lose its opacity, a tiny noise animation from the Make Gradient Noise node on the rotation value gives it a bit more life and randomness. As this needs a Position input to work, we add in a Fire on Display Refresh node and connect its output to the Position input.
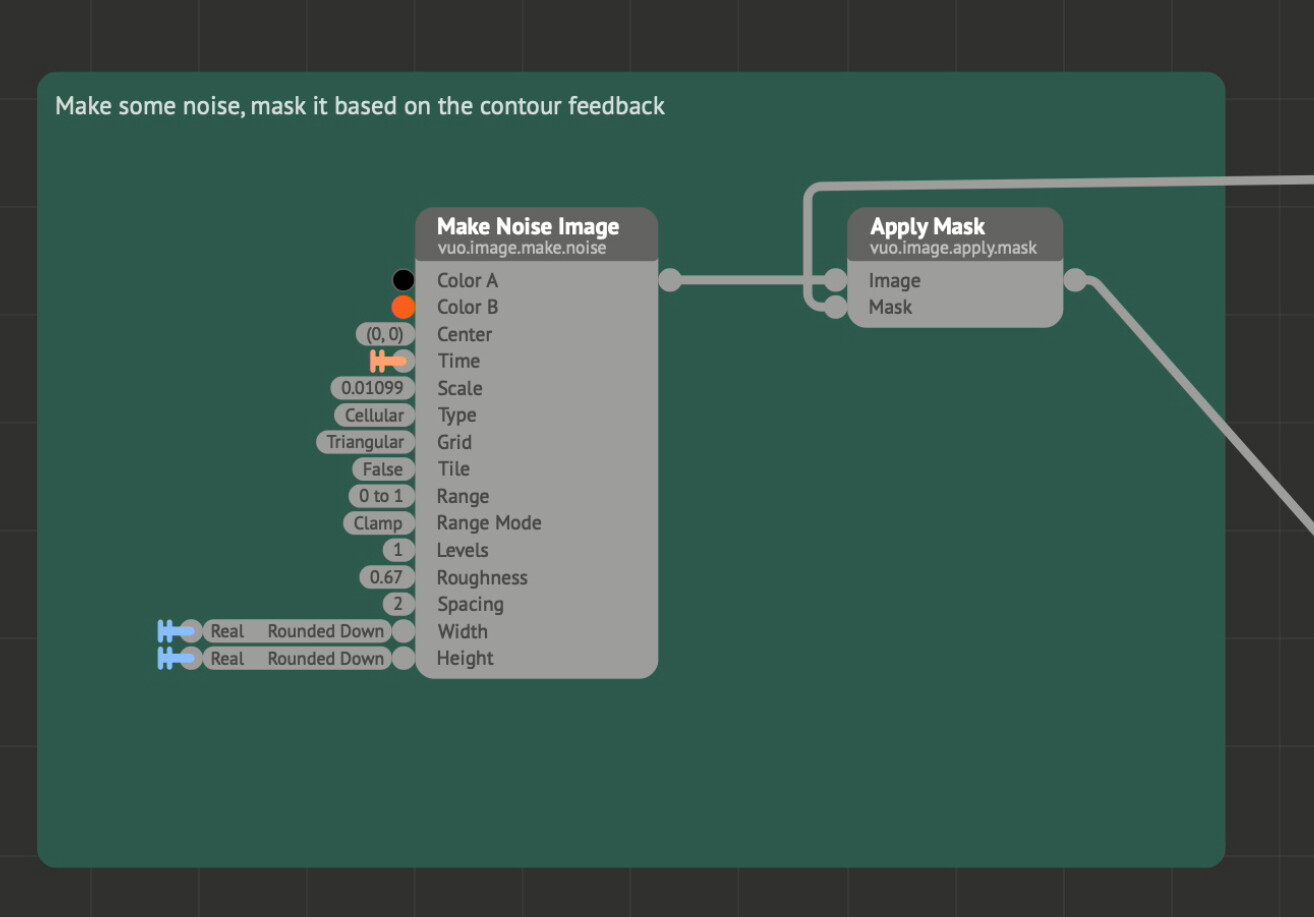
Since we now have a pretty lively mask from the contour of the butterfly, we also need a lively image! The quickest way to get that is by using a Make Noise Image node. This needs a Time input that we get from the Fire on Display Refresh node, and a Width and a Height input that we get from our image size nodes from Part 1. Connect this to the Image input of an Apply Mask node and connect the feedback image from the previous step to the Mask input as shown in Figure 4.
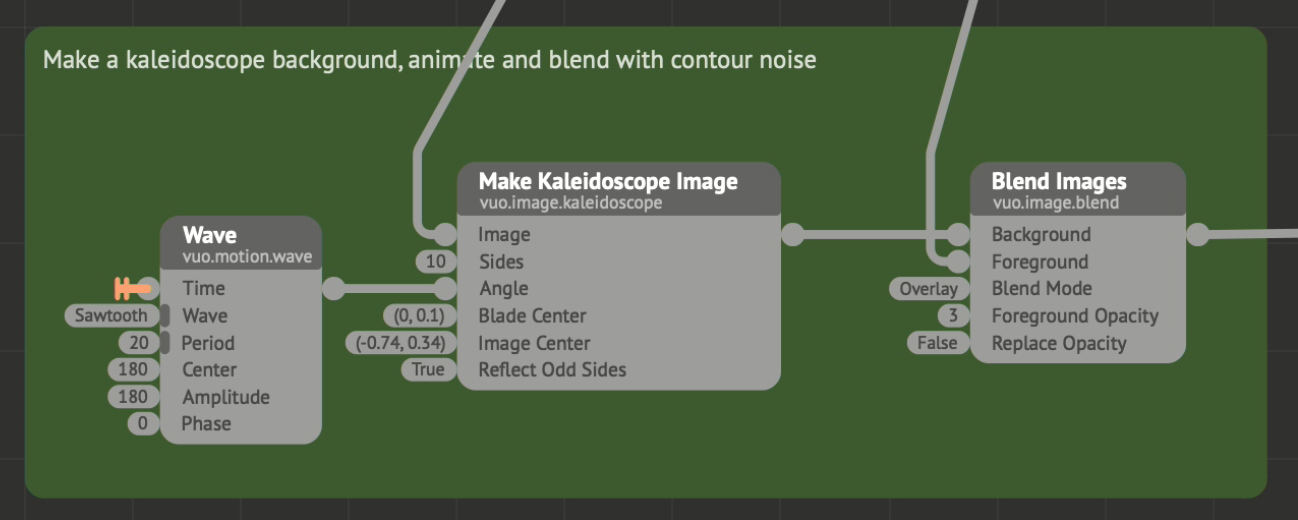
For the background, we can re-use the original image and pipe it into a Make Kaleidoscope Image node. Play around with the parameters until you find something suitable and throw on a Wave node to animate the Angle input to create some life. This time we want to output the kaleidoscope to the Background of a Blend Images node, with the noise image from the previous step as the Foreground input. I found Overlay to be a suitable blend mode here, but others should be explored to see their impact on the end result.
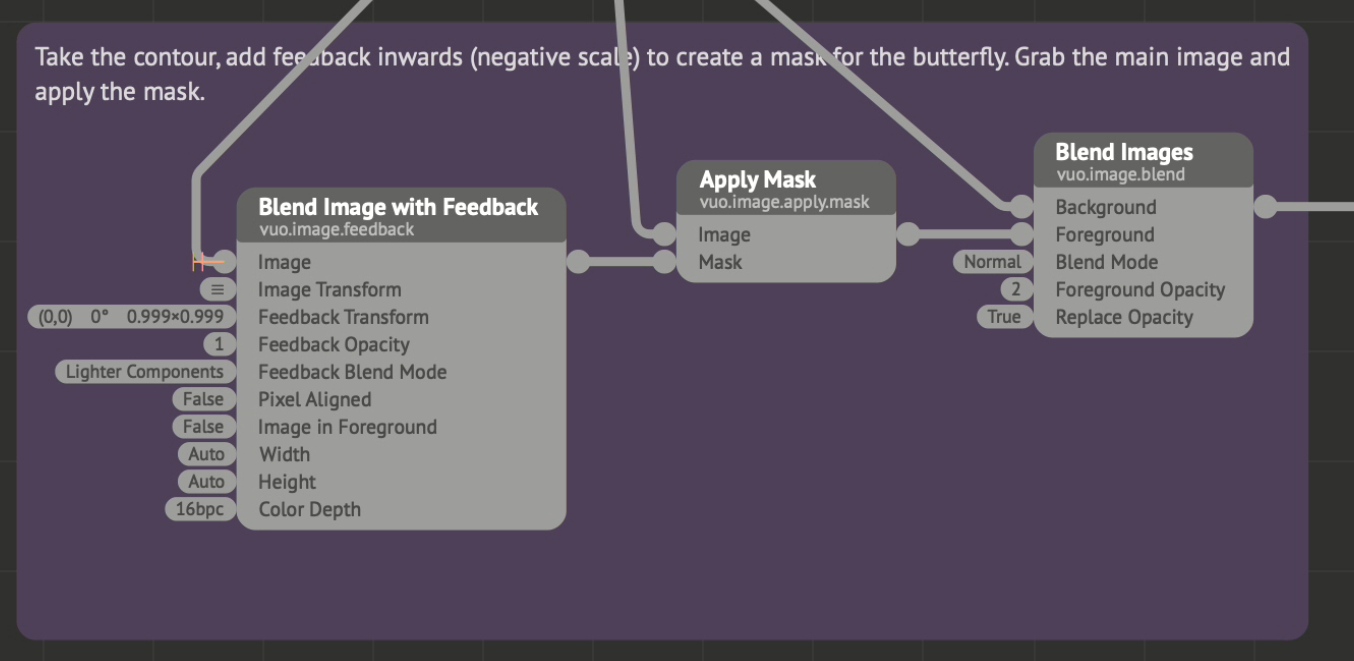
With the background and some effect elements sorted, we can bring back the star of the show: the butterfly as the main foreground object. Since we made an outline for a mask for the outside effect, we can use this contour with a reversed feedback effect to mask out the butterfly from the original image. To do this, take the output from the Adjust Image Colors node and feed it to a new Blend Image with Feedback node. Here we set the Feedback Transform Scale input to 0.999 for both X/Y elements. Doing so will fill the interior of the contour and create a suitable enough mask for the image.
Connect the output from the feedback node to a new Apply Mask node’s Mask input and input the original image to the Image input. Connect the output from the mask node to the Foreground input of a new Blend Images node. Then connect the previous blend node’s output to the Background input. Using a Normal (alpha) blend mode along with a Foreground Opacity set to 2 worked fine here.
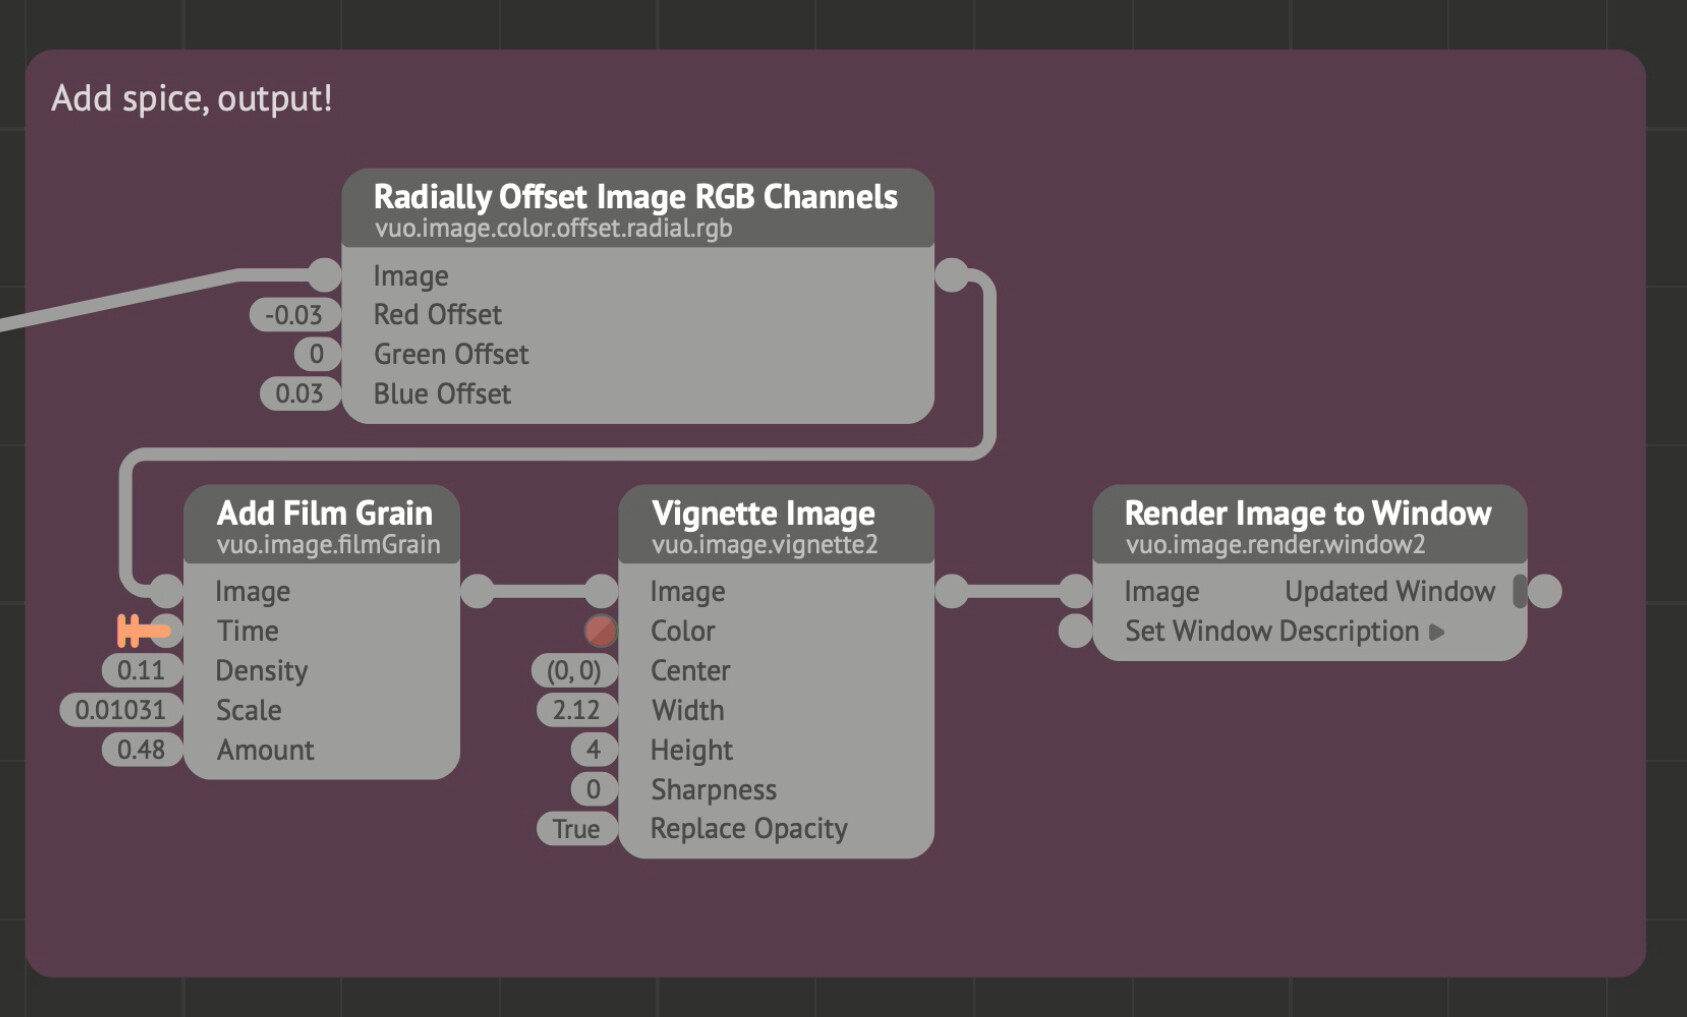
Finally, we can add some makeup and filters to the sketch to make it come together. RGB-offset/chromatic aberration is always fun (in moderation), some film grain, and a bit of tuned vignette is what it takes to go from a flat and not-so-exciting image, to something usable!
The final composition should now look something like this:
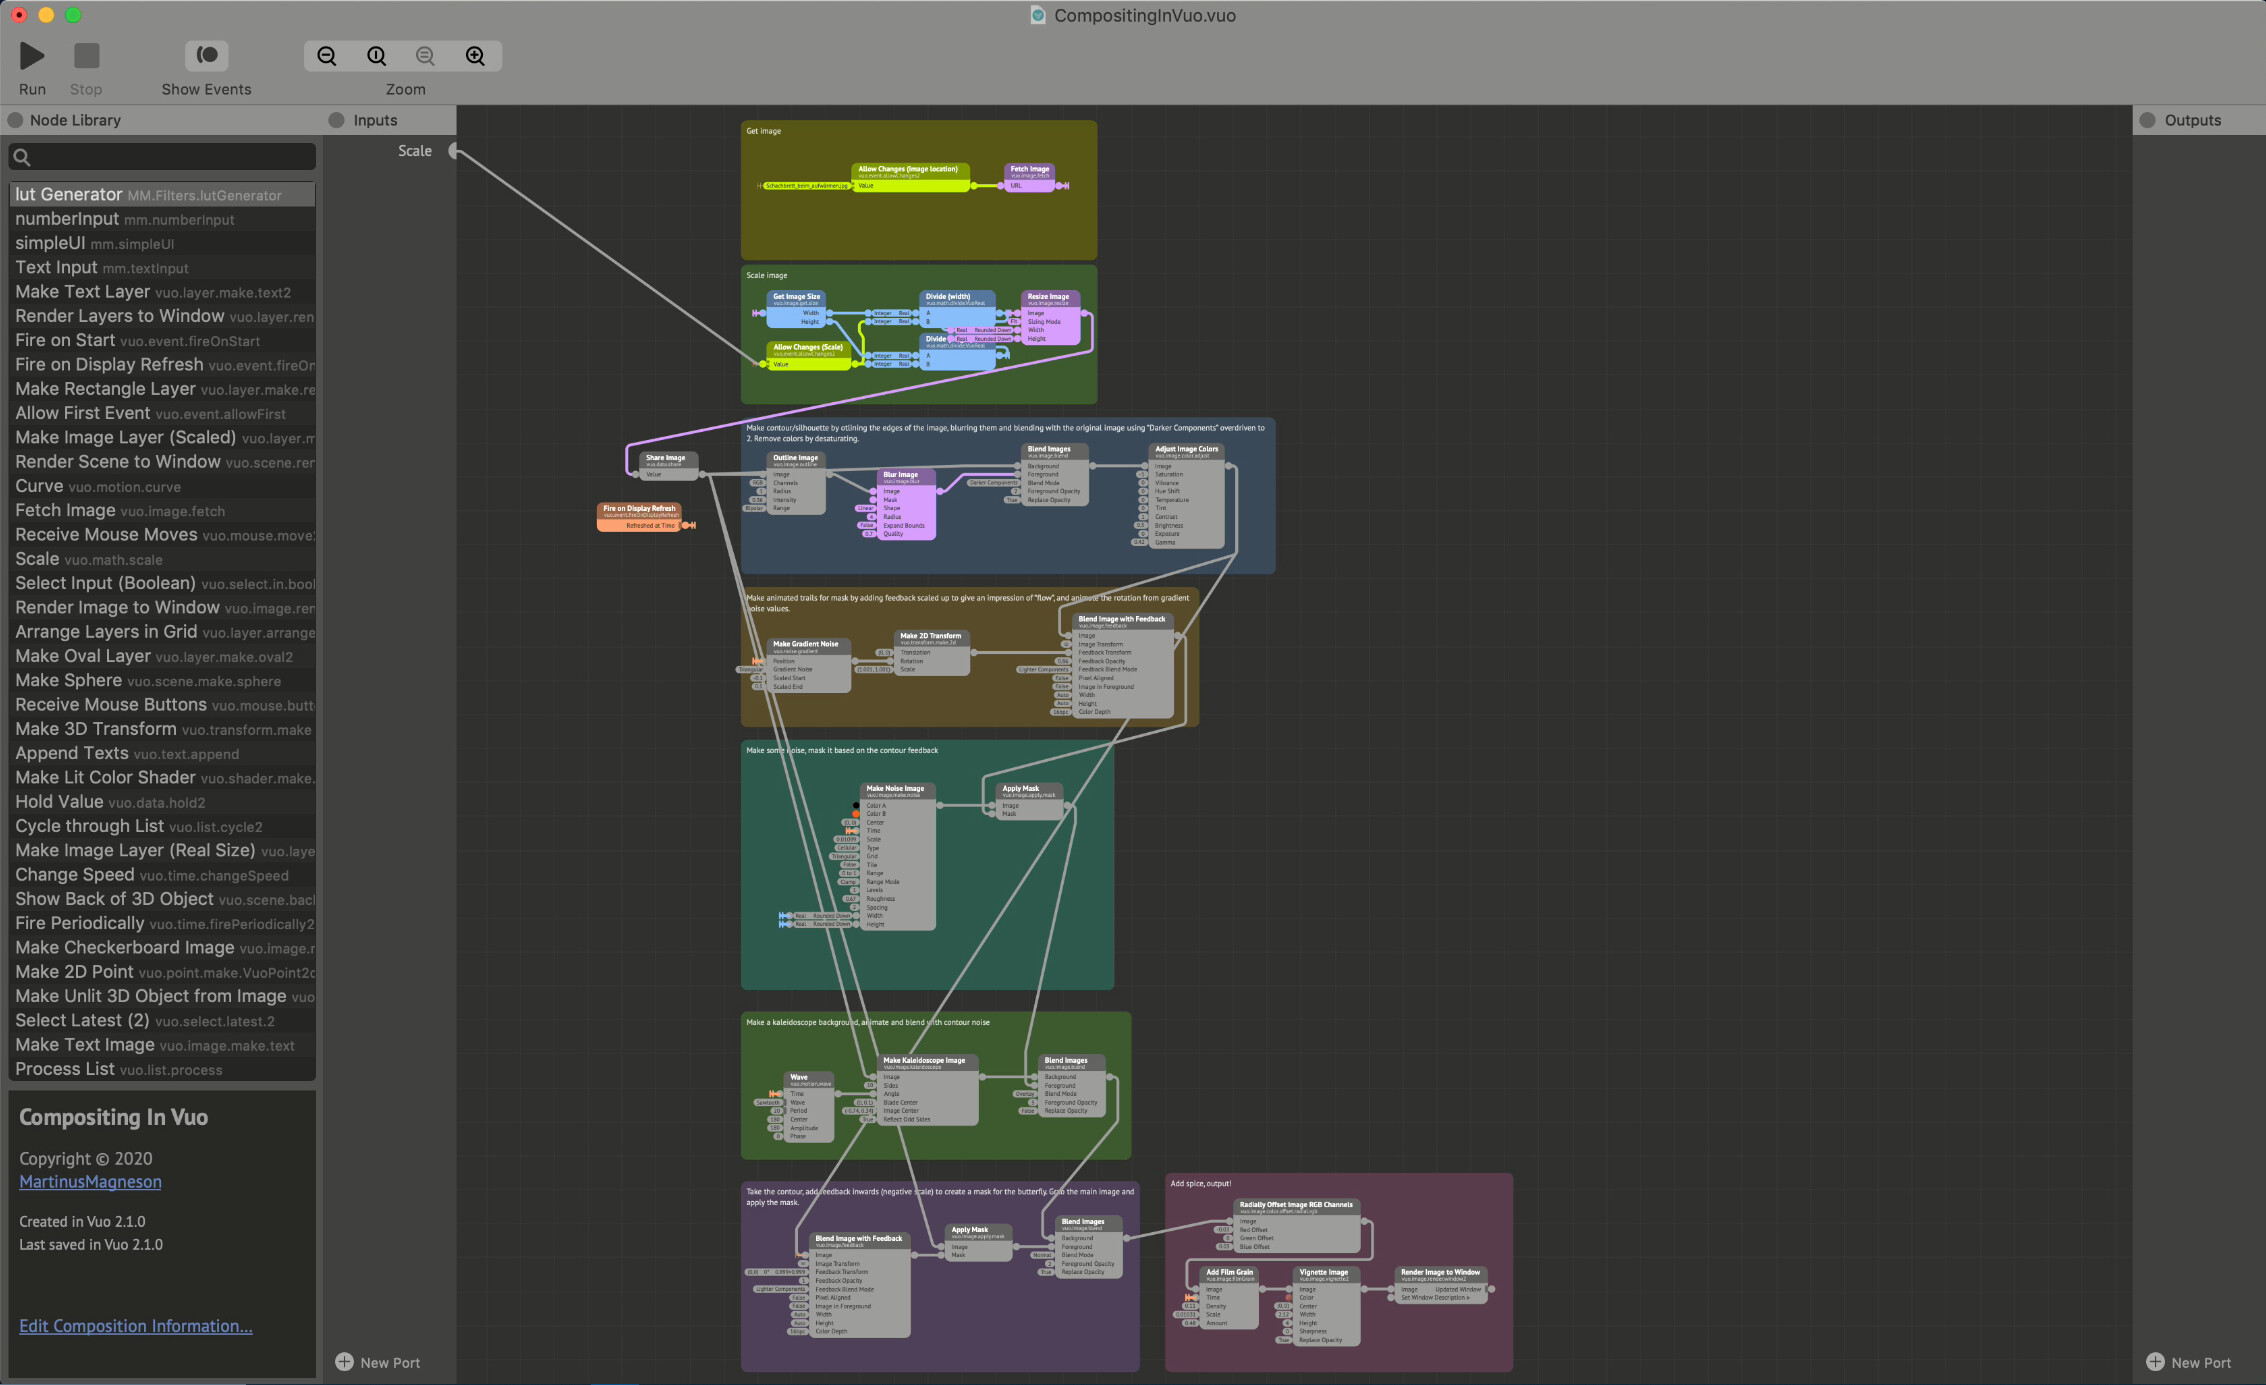
Which is about impossible to read, so make sure to get the composition here and the image used here. Happy noodling!
