Examining a basic composition
Transcript
-
In this tutorial we’ll learn a little more about Vuo by examining this simple composition, which, when we press run, produces this: a blank window, with the text “Hello World” displayed upon it.
-
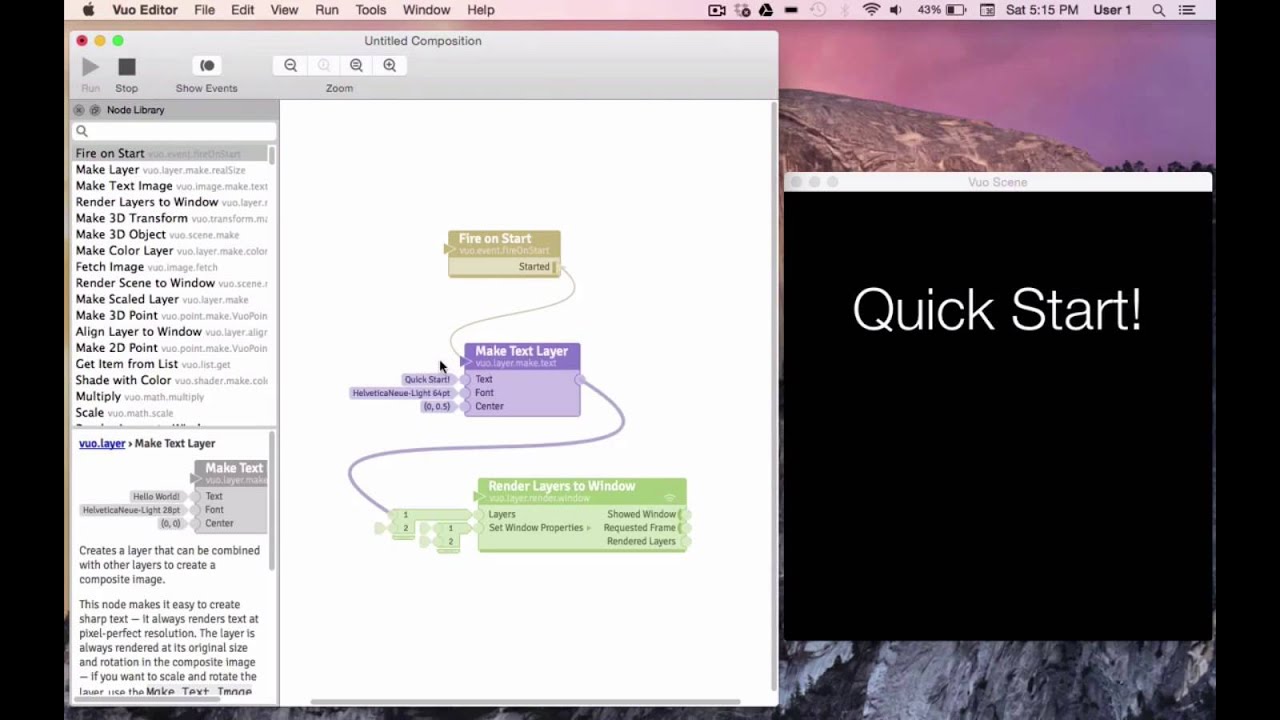
Let’s take a look. Each one of these blocks is a node. Each node performs its own specific function, and nodes communicate by passing information through cables.
-
In Vuo, information always flows from the left of a node, to the right. Therefore, all ports on the left side of a node are input ports, and all ports on the right side of a node are output ports. And any information flowing through a cable will only flow in one direction — from an output port, to an input port.
-
When we look at the flow of this composition, we can trace everything back to “Fire on Start.”
-
When I select “Fire on Start,” and look at our documentation, it says it fires an event when the composition starts. So when we press run, “Fire on Start” is going to shoot an event outward from its “Started” port, here.
-
What’s an event? Events are what make things happen in Vuo. When a composition is running, every node on the canvas is standing ready, eager to perform its function. They just need to know exactly when to do so. Events serve that purpose. Events can be directed into specific ports at specific times to create what you want.
-
Looking at our composition, when it starts, when we press run, we’re going to fire an event out of the “Started” port into this input port of the “Make Text Layer” node. In looking at any node, there’s a dividing horizontal line. The upper portion contains the node’s name and is usually accompanied by one triangular input port. This port is called the refresh port. Whenever a node receives an event here, it’s going to perform its function, as described here, which is to create a layer with text. And if we scroll down we can see that the text port is where we’ll input our text, the font port is where we’ll choose our font, and the center port is where the center of our layer will show up in the window. You can see that our text is located in the center of the window.
-
We can adjust any of these ports by double clicking the port. We can easily adjust the text. I’ll type in “Quick Start.” We can adjust the font or the color. I’ll just increase the text size. And we can adjust the center. If you don’t remember how something works, for example, what exactly is a layer? We can go back and look at the documentation about Vuo’s layers.
-
Here we can read that a layer is very much like an image, except that they can be stacked on top of one another to form a composite image, and we can see that for our coordinate system 0,0 is the exact center of a layer, and that the distance between the center and an edge is a value of 1 unit.
-
Let’s experiment. I’ll move our text upward in the y direction to 0.5. You may be wondering, since we made changes to our text, our font, and now our center, how come we haven’t seen any of those changes in our window? That’s because no event has been fired since we initially started the composition. If we go back to our “Started” port and right click it, it will give us the option to fire a new event, or you can just hold command and click. We’ll fire an event, and now we can see our changes. When you have your composition running, you can fire events like this with any trigger port, which is an output port backed with a vertical bar, called an event-wall.
-
Cool. Looking back at the flow of our composition, we now know that when “Fire on Start” fires an event, it will flow out of its “Started” port down to the refresh port of “Make Text Layer,” which will take the information from its input ports, and then output a layer here.
-
Next, the original event from “Fire on Start” will now carry this new data of our text layer down to “Render Layers to Window.” You’ll notice that the cable coming out of “Make Text Layer” is significantly thicker than the one coming out of “Fire on Start.” This first cable is called an events-only cable, and the second cable is called a data + events cable, and reveals that within this cable events will be carrying the new data of our layer.
-
These are the only two types of cables in Vuo, events-only and data + event. When composing, it’s helpful to remember that data can never be sent by itself, it needs to be carried by an event. We can also note than whenever a port is a triangle, it means that it’s an event-only port. If it’s an output port, it will only send events, and if it’s an input port, it will only receive events.
-
Working our way down, we see that our text layer will arrive at the #1 port for our Layer input port. Since we can stack multiple layers on top of one another, “Render Layers to Window” comes with a drawer that we can drag open to include as many layers as we’d like. “Render Layers to Window” has several more ports that perform different functions. For this tutorial we’re just going to focus on the “Layers” input port. When an event plus a layer enter here, “Render Layers to Window” is going to create a window and render any layers present at the input, as seen here.
-
The window that this composition has produced is actually a separate application. Notice that there’s a new icon in my dock, called the Vuo Composition Loader. This provides some independence from the Vuo editor, so in the unlikely event of an [application] crash you won’t loose your work. You can modify your composition while it’s running, and you can see the results in the Composition Loader.
-
OK. Now let’s walk through what happens from the very beginning. We’ll stop this composition, and now I’ll click run. When the composition started, “Fire on Start” fired an event out of its “Started” port here. That event flowed downstream to the refresh port of “Make Text Layer,” which took a look at its input ports and assembled a layer with the text “Quick Start” in this font, in the upper middle position. Then, our original event, plus the data of this new layer continued onward to the layers input port of “Render Layers to Window,” which produced this window with our layer upon it. Awesome!
-
To keep learning, check out our next video and we’ll build this composition together.

