Building a composition that counts.
Notes
Update: If you’re trying to recreate this composition in Vuo 1.2.4 or later, hold down the Shift key (Vuo 1.2.6+) or Option key (Vuo 1.2.4 and 1.2.5) while connecting the cable from the Fire Periodically node’s Fired port to the Count node’s Increment port. This makes a thin (event-only) cable instead of the default thick (data+event) cable.
Transcript
-
Here we have a composition that, when we press “Run,” counts as such, and now we’ll walk through how to build it. I’ll stop this one, close it, and select “File: New Composition.”
-
For a composition that counts, I know I want to make something happen on a regular basis. Every one second, I want to produce a number. Vuo automatically gives us the “Fire on Start” node, which will produce an event when I press the “Run” button, but for this composition, we want to fire more often than that.
-
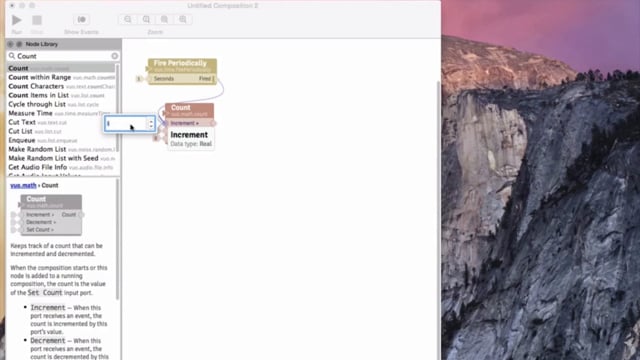
So I’ll go to the Node Library and type “fire,” and select “Fire Periodically,” and we can read in our documentation that it will fire an event however often we set it to at its “Seconds” port. This is exactly what we’re going for, so I’ll drag “Fire Periodically” on to the canvas, tint it yellow, and delete “Fire on Start.”
-
Now we have a node that will fire an event however often we set it to. It’s default setting is one second, that will work just fine so I’ll leave it at that. The next thing we want to do is count. So I’ll go to the node library and type “Count.”
-
Here we find a node called just that and when we read about it, we learn that when it receives an event into its increment port, it will count upward by however much we set it to. Perfect. I’ll drag “Count” onto the canvas and tint it orange.
-
Now I’ll take the stream of events that will be flowing out of “Fire Periodically” every one second and connect it to the increment port of “Count,” for which the default setting is to count upward by 1s. We could change it to count by 5s, or whatever we’d like. And I’ll leave it at 1 for now.
-
Looking at our current setup, the “Count” node is going to keep track of a count, and every one second “Fire Periodically” is going to fire an event into the increment port which is going to increase our count value by 1. And our count is going to be outputted here.
-
The next thing we need to do is take our number and turn it into something that we can read on a window. We want to turn it into some text. I’ll go to the Node Library and type “make text.” We have some different options, and I’ll choose “Make Text layer.” I’ll choose “Make Text Layer” as it would be easy to add a background layer later on if we’d like, and I’ll tint this node violet.
-
When we look at our “Make Text Layer” node, we see that we can input text here, and the default text is currently set to “Hello World.” We can adjust the font and the text color with a standard font editor here, and we can adjust the center position of where this text would be rendered in a window.
-
We want to turn our count into some text, so I’ll drag our count from the “Count” node, and notice that the port for text lights up, the port for our font doesn’t, but the port for the location of the center of our text does light up, because it deals with numbers. But we want to turn the count into some text so I’ll connect it to the text port.
-
When we do so, the text of “Hello World” is replaced with our count, and a Type Converter pops up, which lets us know that our count, which is the format of a real number is being converted to text. Here I’m working with nodes that have specific types of data, but some nodes are able to work with many types of data. For more information on these nodes, and their input ports, called generic port types, you might want to check out the user manual.
-
Alright, our current setup entails that our count, in this font, in the absolute center of our layer, is going to be output here, every one second. Now we need to display it upon a window. I’ll type “display layer.” Notice that the library works with keywords. Even though “render” is the proper term in this case, the library acknowledges the keyword of “display” and produces the node we need.
-
I’ll drag “Render Layers to Window” onto the canvas, and tint it green. This node has several elements to it. The main thing we need to understand for this tutorial is that it’s going to produce a composite image of the layers we send to it here. So we’ll drag the layer containing the text of our count into the layers input port. And there we have it. Let’s go ahead and run it.
-
And we’re counting. Excellent. Check out our next tutorial to learn some more concepts and explore live coding with this composition.

