The differences between images, layers, and 3D objects in Vuo, and how to use layers
Transcript
Hi, I’m Jean Marie from Team Vuo. If you are new to graphics, you might feel a little confused or overwhelmed with Vuo’s ability to input, create, and mix images and 3D objects, and the special terms that are used when working with graphics. In this tutorial we’re going to lay some groundwork for you. Vuo has three main types of nodes for working with graphics: images, layers, and 3D objects. Images are pictures. They could be photographs or computer generated artwork. You can load external images into Vuo using Vuo’s “Get Image” node. We have a short tutorial, Displaying Images, that explains how to do that.
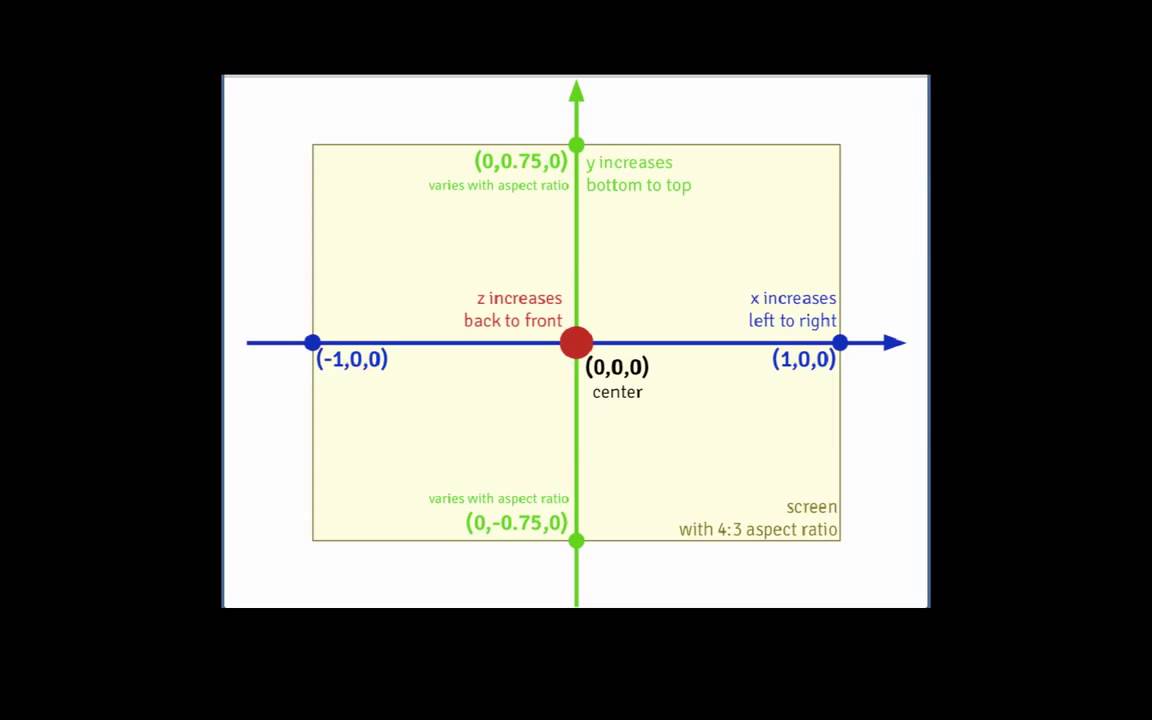
Images only have height and width, not depth. They are defined as 2D objects. In Vuo, width is defined along the X axis, and height along the Y axis. Images don’t have a Z axis, since they have no depth. We’ll look at these axes a little later in the tutorial.
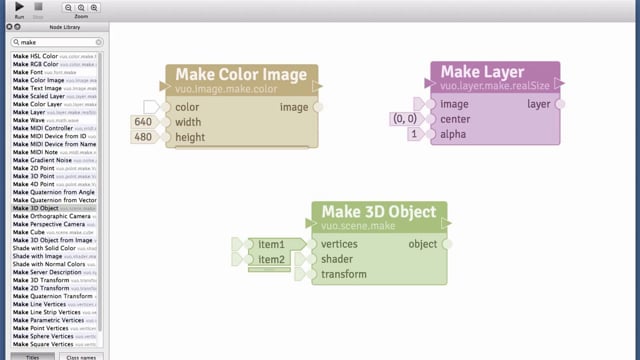
Layers are a special graphic type that function much like images, except you can combine layers together so the layers are seen as if they were stacked on top of one another. Unlike images, layers cannot be input into Vuo. Layers must be created from images or made inside Vuo. Let’s create two layers and combine them.
I’ll use a “Make Colored Layer” node first. I’ll put it on the canvas and pick the color using the color-picker input port. Then, to see the layer, I’ll have to use a “Render Layers to Window” node. Render is a graphics term that simply means, “display.” I’ll connect the two. Since Vuo uses events to cause things to happen, I’ll add a “Fire on Start” node and connect that up to the “Make Color Layer” node. Now see what happens when I run it. I get a window filled with the yellow color that I wanted.
Let’s add an image. You can see I’ve already put a “Get Image” node on the canvas, and I’m using an image from my desktop. Now “Get Image” will output an image, but I need a layer. So I go to the node library and I’m going to use the “Make Layer” node. The “Make Layer” node will receive an image and convert it to a layer.
Now you may notice that this says “make layer realSize” as the class name. If I wanted to make an image of a different size I’d have to use the “Make Scaled Layer” node, but I want the image at the actual size. So we are going to take this image [output port from the “Get Image” node and connect it] to the image [input port of the the “Make Layer” node] and we’re going to take the layer and add it here [taking the output from the “Make Layer” node and connecting it up tot the “Render Layers to Window” node], and because in Vuo you need events to get things started, we are going to draw another cable to our “Get Image” node [taking a cable from the started port of “Fire on Start’ to the refresh port of the “Get Image” node] and now we are going to run our composition. And you can see we did get our Vuo logo on top of our yellow background.
Notice the order of cables as they go into the “Render Layers to Window” node. The color layer appeared behind the image layer. The image layer was in front of it. If I switch these two cables, you wouldn’t be able to see the image, all you’d see was the color layer.
Before we get started, I’m going to expand the input drawer. Now we are going to add text to our composite image. To do that, we are going to use a “Make Text Image” node. So we’ll put this on the canvas and again we are going to need another “Make Layer” node. So here we are going to do a command C to copy, a command V to paste so we have a duplicate “Make Layer” node. We’re going to connect it up, but, I want it to say “IS FUN.” And [I’m drawing] another cable [from the “Fire on Start” node to the “Make Text Image” node] and we’re going to run our composition. You can see “IS FUN” on top of our logo. Now let’s move that text down so that it’s not immediately on top of the logo. To do that we take a look at the center, and the center is X 0, Y 0. Since Y is height, we are going to put a -.5 in to see if we can move the text image down and let’s see if we can use our font picker to make the text a little bigger. Let’s try 36. Now let’s run the composition. And we get “Vuo IS FUN.”
As I mentioned earlier, the position and size of 2D and 3D objects are defined in Vuo using Vuo’s coordinate system. Travis explains it in detail in the tutorial, “Displaying 3D Objects in Vuo,” but just as a quick introduction, this is a diagram of Vuo’s coordinate system. As I mentioned, X is width, Y is height, and Z is depth. Width is defined as 1 unit to the right of the center point, and 1 unit to the left, for a total width of 2. The Y axis is proportional, and if the window is square, the height is 2 units.
We’ve covered images and layers in this tutorial. Now we’ll take a look at 3D objects. As the tutorial on displaying 3D objects explains, displaying objects in 3D space is called a scene, so in order to view 3D objects in a window, we need to render the scene to a window. If you want to bring in one or more 3D objects from a file you would use the “Get Scene” node. You can also make objects in Vuo, for example, the “Make Cube” node, or the “Make 3D Object from Image.”
Notice that the center of the “Make 3D Object from Image” node has three dimensions, X, Y and Z. What does that mean for an image? It means that the image, with width and height, becomes like a piece of paper. A piece of paper suspended in 3D space. It now has a front and a back. What we think of as the image is only on the front side of the paper. When it becomes a 3D object, that means you can flip the image over if you wanted – something that doesn’t make sense with a 2D object. However, there is nothing on the back of the image, so when it’s flipped over you won’t see anything. That tutorial, Displaying 3D Objects, goes into detail on how to manipulate a 3D object made from an image in 3D space, so I won’t cover it here.
In this tutorial we’ve talked about taking an image and turning it into a 3D object. You can also take 3D objects and turn them into an image, like taking a picture. You can do this with a “Render Scene to Image” node. You can input multiple objects and output an image.
So, to recap, in Vuo you can work with images, layers, and 3D objects. You can take 2D images and combine them using layers. You can take layers and form composite images. You can turn images into 3D objects, manipulate 3D objects, and you can take a picture of 3D objects to create a 2D image. I hope this tutorial begins to help explain how Vuo can be creative with graphics.
If you’d like to learn more about Vuo development or our plans for Vuo, you can check out vuo.org. And we hope you will consider becoming a part of the Vuo community and supporting Vuo by purchasing a subscription. Thank you so much for checking out Vuo and we look forward to seeing what you can create.

